Monday, February 27, 2012

Finals Stew

Finals at Krannert have arrived, and with it, I wanted to create a dish that wasn't too difficult to make, and that I could keep eating for a few days. What I came up with was this once-around-the-kitchen pork and vegetable stew with infused with Asian-inspired flavors. The dairy-based broth gives it a nice creaminess. I've also used turmeric, which is used in Asian cuisines to impart a bright yellow color to food.


Ingredients
  • 2 slices pork loin
  • 5 small red potatoes
  • 4 carrots
  • 2 small onions
  • Handful of sliced mushrooms
  • 1 cup Frozen peas
  • 2 1/2 cups skim milk
  • 1/2 cup half and half
  • 2 cups water
  • 1 tsp paprika
  • 1 tsp coriander
  • 1/2 tsp cardamom
  • 1 tsp turmeric
  • 1 tsp cumin
  • 1/2 tsp garlic powder
  • 1/4 tsp cayenne pepper (optional)
  • Half lemon
  • Salt and pepper
  • Vegetable oil

Instructions

Get the broth going. Combine water, milk, and half and half in a large pot and bring to a boil. Add the spices and however much salt and pepper you want. Cut the potatoes into small pieces (2-8 pieces depending on size). Peel and chop carrots into pieces. Once boiling, bring down to a simmer and add potatoes and carrots.


Heat vegetable oil on high in a frying pan. Cut the pork into slices and quickly brown both sides. Add to the broth. Slice onions into strips and saute until soft and browned. Add to the stew. Do the same for the mushrooms. 


Cover and simmer the whole thing for 30 minutes. Squeeze the lemon juice in, then add peas. Cook for 15 more minutes. At this point, the pork will be very tender. Serve over rice.

Saturday, February 25, 2012

Arroz con Pollo

Arroz con Pollo is a traditional Latin American dish, found all over the Spanish speaking world. I really like how cooking everything together infuses the flavors very well. This gives it an almost stew-like quality, without having to spend hours cooking. Arroz con Pollo calls to mind the flavors of paella, a dish which no doubt shares some roots. As is often the case for a dish which I have no previous experience making, I looked around the internet for ideas, and came up with this simple and easy version.


Ingredients

Chicken
  • 6 chicken legs or thighs
  • 1/2 tsp salt
  • 1/2 tsp black pepper
  • 1/2 tsp smoked paprika
  • 1/2 tsp cumin
  • Olive oil
Rice
  • 1 small onion, diced
  • 1 clove garlic, minced
  • 1 1/2 cups uncooked rice
  • 2 cups chicken stock
  • 1 cup diced tomatoes in juice
  • 1/4 tsp oregano
  • Pinch of cayenne pepper (optional)
  • Olive oil

Instructions

Mix together the dry rub ingredients, and coat the outside of each piece. Heat olive oil in a large sauté pan, medium high heat. Cover then pan and brown the chicken on all sides. It doesn't need to be cooked through at this point. Once the outsides are cooked, set aside. If your chicken pieces are especially big, you may want to spend a little extra time here to make sure they are cooked through at the end.


Add a little more oil, turn the heat down, and cook the onion until softened. After a few minutes, add the garlic, too. Add the rice to the pan, and more oil if needed. Toast the rice for a few minutes, until opaque. Stir frequently to avoid burning. Add chicken stock, tomatoes, and oregano. 


At this point, I switched from the saute pan to a bigger pot to prevent it from overflowing. If your sauté pan is big and deep, you may not need to. Bring the whole thing to a boil and submerge the chicken, as well. Once boiling, back the heat off to low, and simmer for 20 minutes. Check on the rice. Be careful of grains getting stuck to the top parts of the chicken and not cooking properly. If you find the rice is too firm, add a bit more stock and cook a little longer.


Serve with wedges of lemon to squeeze over the rice. Negra Modelo is a tasty Mexican dark lager that is quite appropriate for this meal. And if the guys over at BeerAdvocate have anything to say about it, avoid the lime.

Thursday, February 23, 2012

Mushroom and Swiss Burger

It is said that on their long rides across the steppe, the Mongols would keep a piece of meat under their saddles, which would tenderize the meat, and that this was the origin of the hamburger. Whether or not this is true, the burger is arguably the most famous part of classic American cuisine, and it's hard to find a diner or pub that doesn't serve them. One of my favorite burger styles is the Mushroom and Swiss burger. This isn't your run-of-the-mill fast food burger - we're using real Swiss cheese. I've chosen to broil the burger to emulate the effect of grilling while still indoors.


Ingredients
  • 1/3 pound ground beef (85% lean)
  • 1/4 small onion
  • 3-4 big mushroom slices
  • Swiss cheese (Emmentaler or gruyère)
  • 1/4 tsp salt
  • 1/4 tsp black pepper
  • 1/4 tsp Worcestershire sauce
  • 1 Kaiser roll
  • Olive oil

Instructions

We'll go with the one pan approach here, but you could easily use a second one to cook the burger. Slice the onion into thin strips, and cut the mushroom into more easily handled pieces. Heat olive oil in an oven-safe pan. Saute the onions and mushrooms until onions become soft and a little brown. Set these aside.


Fire up the broiler and make sure the rack is as high as it goes. Mix the salt, pepper, and Worcestershire into the meat. Form into a patty 3-4 inches in diameter, to fit your roll. Burgers tend to reduce in diameter and increase in thickness as they cook, so make it a little thinner than you want it to turn out. Put the patty in the pan, and broil for 4 minutes. While this is happening, you can slice the cheese. Cut enough to make a thin layer over the top of the burger.

Flip the burger over, and cook about 3-4 more minutes. When you have about a minute to go, take the pan out, cover the burger with cheese, and put it back under the broiler. Slice the roll in half, and toast in a toaster oven for a few minutes. When done cooking, place the burger on the toasted bun, top with the onions and mushrooms, and serve with ketchup for dipping.

Tuesday, February 21, 2012

Pasta alla Carbonara

Pasta alla Carbonara is a dish you see floating around in restaurants in the U.S. quite a bit. Like many other pasta dishes (Bolognese for example), the traditional Italian version is simpler than the ones typically seen around here. The classic Carbonara features bacon, egg, cheese, and black pepper - no peas, cream, or mushrooms. In my version, I have used fettuccine instead of the usual spaghetti, and good old American bacon instead of Italian pancetta or guanciale.


Ingredients
  • One box dry pasta (3/4 - 1 pound)
  • 4 strips thick cut bacon
  • 4 cloves garlic
  • 2 large eggs
  • 3/4 cup grated Parmiggiano-Reggiano
  • Black pepper
  • Salt
  • Olive oil

Instructions

For the pasta: Boil water in a large pot. Salt the water liberally. Boil the pasta for 8 minutes, and set aside. Save a bit of the water, too.


For everything else: Cut the bacon into strips 1/4 - 1/3 inch in width. Heat a bit of olive oil in a large pan on medium heat. Start cooking the bacon. Mince the garlic and add that after a few minutes. Cook together until the bacon gets crispy, the fat renders, and the garlic gets browned. Turn the heat up a bit if needed.


While the bacon cooks, crack the eggs into a bowl and beat into a homogeneous mixture. Grate the cheese and mix it into the beaten eggs. Add the pasta into the pan and mix thoroughly to ensure it is hot and coated with the bacon fat. Now, remove the pan from the heat. Pour the egg-cheese mixture over the pasta and mix it in. The heat leftover will cook the eggs. Generously grind pepper over the pasta. Stir everything together for another minute or two. If desired, add a little of the pasta water to thin out the sauce. Serve with a little more grated cheese and parsley.

Sunday, February 19, 2012

Roasting Sausages and the "One Pan Meal"

Today, No Free Lunch reached 1500 pageviews. Thank you to all my dedicated readers. Make sure to tell all your friends about No Free Lunch and all the great things you've learned how to cook. I've been having a great time with this blog so far. If you have any suggestions or challenges (I do love a challenge) for me, please post them in the comments!


Today, I don't have a new full recipe, just some ideas. Previously, I seared and poached sausages. Another great method is to roast them. Roasting is perfect if you really want to keep the moisture inside the sausage. This leads us to a lot of great, easy "one pan meal" ideas. I like this approach to dinner because you can get everything in the oven and then do something else while it cooks. If the different items take different amounts of time to cook, either put them in partway through, or take them out.

In addition to sausages, chicken legs and potato wedges (now updated with a new photo) work very well as part of your one pan meal. While the pan is in the oven, you also have plenty of time to prepare a salad or other side, as well.

Saturday, February 18, 2012

Croque-Monsieur

Another essential food lesson Mom taught me was the power of the sandwich. Simple, elegant, and so often delicious. I have eaten a lot of ham sandwiches in my life, but nothing tops a well-made croque-monsieur. The croque-monsieur is the quintessential French café food. Literally translated as "Mr. Crunchy," this sandwich combines crunchiness, creaminess, and a decadent cheesiness in every bite. This recipe makes two sandwiches. 
  

Ingredients 

Sauce Mornay
  • 1 TBS butter
  • 1 TBS flour
  • 1/2 - 2/3 cup milk (I used skim)
  • Splash of cream
  • Salt and Pepper
  • Pinch of nutmeg
  • 1/3 cup grated gruyère, loosely packed

Sandwiches
  • 4 slices Italian bread
  • Sliced ham
  • A little extra grated gruyère
  • Dijon mustard

Instructions 

We'll first prepare the Sauce Mornay. Essentially, Mornay is a Sauce Béchamel with cheese folded in. It's also great on pasta or with a lot of other foods. Melt butter in a saucepan on medium heat. Add flour and stir together. Cook until the mixture has darkened a bit. Heat up the milk, with a splash of cream. I just use the microwave for this. Slowly pour the hot milk into the saucepan while stirring. How much milk you use will determine the thickness of the sauce. Mix together well, and simmer a bit. Add salt and pepper to taste, and a bit of nutmeg. Finally, add the cheese and stir in so that it melts into the sauce. Set this aside, but make sure to keep it warm.


Spread mustard over two of the bread slices. Put several pieces of ham on each, however much you desire. Smear the sauce over the ham. Don't use all of it. Depending on preference, use up about 2/3 of the sauce here, maybe a bit less. Cover with the remaining bread, and smear the rest of the sauce over the top. Optionally, sprinkle some more grated cheese on top.


Place the sandwiches in a baking pan, and broil for about 1 1/2 minutes. Be very careful, and keep a close watch on the oven. It is very easy to burn the edges of the bread (as I did here). If this happens, just crack the burnt pieces off. When you're done, the cheese on top will be browned, and the bread crunchy. A popular variation, the Croque-Madame ("Mrs. Crunchy"), features a fried egg on top. Bon appétit!

Thursday, February 16, 2012

Roast Chicken and Gravy

For some reason, as kids, we always associated roast chicken with parades. I'm not really sure why this is, but I do know it makes for a tasty, easy to prepare meal. While I normally eat chicken legs without sauce, the relative dryness of the breast makes gravy (or some other kind of sauce) a must. I never used to make gravies, but they really are not hard to do, and taste great with this dish. The onions, I find, add some more complexity to the sauce.


Ingredients
  • 1 large split chicken breast, skin on
  • 1 TBS butter
  • 1/4 onion, diced
  • 1 1/2 TBS flour
  • 3/4 cup chicken stock
  • Salt, pepper, and garlic powder

Instructions

Preheat the oven to 450 degrees. I deboned the chicken breast before starting out. I did this so that it would be easier to sear the underside of the meat, but it's up to you. Season both sides of the chicken with salt, pepper, and a bit of garlic powder if you like. Melt butter in an oven-safe pan on medium-high heat. Cook the chicken for several minutes on each side, until there is a nice sear and the skin side is crispy. Put the pan in the oven and roast for about 15 minutes, until cooked through. This will vary with size; mine was a big, thick piece that plumped up even more as it cooked. As usual, the poke test is a good test for doneness (stab the chicken in the thickest part with a sharp knife; if the juice is clear, you're done). You may want to flip the chicken over halfway through.


Set the chicken aside. Put the pan back on the stovetop and sauté until softened. Add flour and cook together for a few minutes, mixing the flour into the melted butter left in the pan. Once this darkens a bit, pour in the chicken stock and deglaze the pan. Simmer the gravy for a bit more, to desired consistency. Season to taste.


This meal is great with rice or mashed potatoes. Pour the gravy over the chicken and your chosen staple, and enjoy!

Tuesday, February 14, 2012

Mashed Red Potatoes

Mashed potatoes were another integral part of my diet growing up. Due to Mom's love of the dish, we ate it a lot. Good mashed potatoes are easy to make, and don't require too much effort. That's why I have trouble understanding why people would make instant mashed potatoes from dry flakes. I posted a mashed potato recipe earlier, as part of my Bangers and Mash, but I've refined the recipe and can attest this one tasted great. The key to getting the right texture is the addition of the butter, milk, and cream. I've also used red potatoes here to make use of the skins.


Ingredients
  • 3 red potatoes
  • 2 TBS butter
  • 1 1/2 TBS cream
  • 1 TBS skim milk
  • Salt and pepper to taste

Instructions 

Boil water in a large pot. Cut the potatoes into halves or quarters. With red potatoes, you get a nice texture and color if you leave the skins on, but you can peel them if you want. Boil potatoes for about 20 minutes, or until they become soft enough to poke with a fork. Once cooked, drain the potatoes and transfer to a large bowl.


Add butter, cream, and milk. Smash together with a potato masher. Make sure the butter gets fully melted and folded into the potatoes. The heat from the potatoes should do this naturally. Mash to your desired consistency. I usually don't like them super smooth when using red potatoes.

Mashed potatoes are an incredibly versatile staple food. They go very well with steak, pork, stews, chicken, and more. At Piper's Pub in Pittsburgh, mashed reds are served with Chicken Vindaloo. Another good combination is with creamed peas. The possibilities are endless.

I ate these mashed potatoes as an accompaniment to IKEA's Swedish meatballs and lingonberries with a glass of Woodchuck Amber cider. If you've never tried them, the IKEA frozen meatballs are really quite good, and you can buy the whole meal right there in the store - meatballs, sauce mix, lingonberries, and even frozen mashed potatoes. Here, however, the potatoes are made fresh.

Sunday, February 12, 2012

Wiener Schnitzel vom Schwein

I love Wiener Schnitzel. My appreciation of the dish probably originates while traveling in Germany and Austria many years ago; since "Wiener Schnitzel" is one of the only German phrases I know, I ate a fair amount of it. Wiener Schnitzel is most associated with Austria ("Wien" being the local name for Vienna), but it is popular all over Europe and worldwide. In Italy, they have the cotoletta alla milanese, which is cooked bone-in in butter. In Japan, the meat is breaded with panko and served with a sauce as tonkatsu. In Indiana, we have the breaded tenderloin sandwich. Schnitzel is traditionally made from veal, but pork is commonly used, especially outside of Austria, where the pork variation must legally be called Wiener Schnitzel vom Schwein


Ingredients
  • Pork loin, sliced
  • 1 Egg
  • Flour
  • Breadcrumbs
  • Salt and pepper
  • Wedge of lemon
  • Vegetable oil

Instructions 
With a sharp knife, trim the fat off the sides of the pork. If you have really big, thick slices, consider butterflying the meat also. Cover with plastic wrap and pound thin, to about a quarter inch thick. If you don't have a good meat hammer, use a soup or bean can. I find the plastic wrap stops the hammer from sticking to the meat. It also prevents your soup from getting all meaty.

Prepare two plates, one with flour and one with breadcrumbs. Beat an egg in a bowl. We are now ready to prepare the cutlets. Generously salt and pepper each side of the pork. Then press each side into the flour to coat. Next, dip in the egg, making sure to coat well. Finally, press into the breadcrumbs and thoroughly cover both sides.


We will shallow fry the cutlets. Heat oil in a flat-bottomed pan. You don't need to use too much oil, enough to cover the bottom of the pan, but you don't need to submerge the cutlets. As with all breaded foods, you need to be careful about the oil temperature. You want it hot enough to get the breading nice and golden brown, but not too hot to burn. I find that the right temperature is somewhere between medium-high and high. Once the oil is hot, carefully lay the cutlets in the pan. Cook for about 3 minutes on each side. Turn the cutlets over very carefully with a fork, as to not disturb the breading. This is important to get the right texture and beautiful golden brown color on your schnitzel.


When finished cooking, let the schnitzel rest on a paper towel to dry off a bit. The traditional Austrian way is to serve with lemon wedges to squeeze over the schnitzel before eating. I should also note that the pork may remain a bit pink when you cut into it; this is completely safe. For drinks, we again go to lager, this time as a tribute to the region of origin. You can't go wrong with German, Austrian, or Czech here.

Friday, February 10, 2012

Pan Seared Salmon

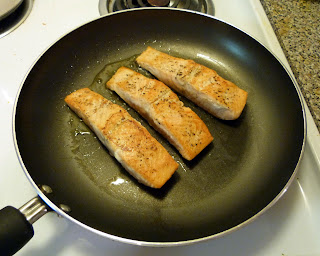
This is a simple dish, easy and quick to make. As with my pan fried steak, the idea here is to let the main ingredient speak for itself. I buy the salmon filets at Sam's Club. At home, I slice them into pieces like you see in the picture, and freeze them. If you live by yourself, the freezer is an invaluable tool. I also decided to experiment with a sauce to liven up the dish. Regular readers of No Free Lunch may know that sauce making really interests me; it's a way to be creative with flavors without using expensive ingredients. Today I have a yogurt-based mustard sauce. Readers may also notice recurring ingredients. The yogurt happens to be leftover from making the tandoori marinade.


Ingredients

Salmon
  • Salmon fillets, cut into strips
  • Handful of fresh spinach leaves
  • Salt, pepper, and garlic powder
  • Olive oil

Sauce
  • 2 TBS plain yogurt
  • 1 tsp Dijon mustard
  • 1/2 tsp mayonnaise
  • Generous squeeze of lemon juice
  • Sprinkle of dill weed

Heat olive oil in a non-stick pan. I prefer non-stick when working with fish, because the fillets break apart easily if stuck to the pan, unlike beef, pork, or poultry. Salt and pepper each side of the salmon. When the oil is hot, lay the fillets in the pan. Cook for 3-4 minutes each side, until the exterior is firm to the touch and well seared but the interior is not overcooked. Remove and set the fish aside. Using the leftover oil, cook down the spinach, and season to taste with salt, pepper, and garlic powder. The spinach adds some nice color to the plate, as well as being tasty and good for you.


The ingredient amounts for the sauce given above are proportional and easily multiplied. Make as much as you need. The proportions can also be played with if you prefer a mustardier sauce. I also like making up words. Mix the sauce ingredients together in a bowl, and stir thoroughly. Spoon over the salmon and garnish with a little extra dill weed. This is a sure way to make this simple dish look fancy.

I also had some white rice with the meal. As for a drink accompaniment, high quality lagers are the way to go for the lighter flavors of fish. I recommend Budweiser Budvar Czech lager. This tasty pilsner is known as "Czechvar" in North America, due to the rather obvious trademark dispute. 

Tuesday, February 7, 2012

Beef Ragù

Like many people, I ate a lot of pasta in college. It was quick and required little effort. I could just cook it in an electric water boiler and shovel some jarred sauce onto it. There is no shame in using jarred sauce, and I still do so often, but this kind of slapdash cuisine is no longer satisfying to me. It is not to hard, however, to create a tasty pasta dish just from ingredients you have in your fridge or pantry. That's what I did today with this simple beef ragù. Ragù is simply a meat-based sauce, and can get much more complex than the quick one I present today. Traditional ragù originates from the Italian cities of Naples and Bologna.


Ingredients
  • 3 cups dry pasta
  • 1/2 onion
  • 1 clove garlic
  • 1 pound ground beef
  • 1 1/2 tsp dry basil
  • 1 1/2 tsp dry oregano
  • 1 cup crushed tomatoes
  • 1/2 cup diced tomatoes
  • Salt and pepper
  • Pinch of paprika
  • Parmiggiano-Reggiano
  • Olive oil

Instructions

While you are preparing the ragù, you can cook the pasta. Heat a pot of salted water and boil the pasta for about 10 minutes. I used farfalle, but go with your favorite. Once finished, drain, rinse, and set aside.


Dice the onion and finely mince the garlic. Heat olive oil on medium-high in a large sauté pan. Cook the onion until softened. Add the beef and garlic and turn heat up to high. Cook until beef is browned. While the beef is cooking, make sure to break up and chunks. Add basil and oregano while beef is cooking, and mix in. Season with salt and pepper also. 


Turn the heat back to medium-high and add both the diced and crushed tomatoes. Stir to integrate and simmer for a few minutes. Season with salt, pepper, and paprika as desired. Now, transfer the ragù into the pot with the pasta, and stir to coat. When serving, grate or crumble Parmiggiano-Reggiano over the pasta. This recipe should make about three servings.

Monday, February 6, 2012

Schlafly Bottleworks

St. Louis has a long association with brewing, and was home to many producers pre-prohibition. The most famous among them, of course, is Anheuser-Busch. In more recent years, craft brewers have emerged. We visited the Schlafly Bottleworks, the primary brewing and bottling facility of the Saint Louis Brewery. They offer a free tour of the brewery and beer tasting that I would definitely recommend for beer fans.


Located in a former supermarket, the Bottleworks is home to a pub, beer garden, store, and a small museum of St. Louis brewing history, in addition to the brewing and bottling facilities. Our guide informed us that Schlafly produces 45,000 barrels of beer each year, an output that Anheuser-Busch can match in just a few hours. Their brewhouse, pictured below, is where the beer-making process begins, before moving to storage containers to ferment.


To qualify as a craft brewery in the United States, a brewery's "flagship beer" must use the four craft beer ingredients: water, barley, hops, and yeast. This means no "adjunct" ingredients in the mash, like the major brands use. Schlafly's flagship is their English-style Pale Ale. They must also be locally owned and produce under six million barrels each year. Schlafly was the first craft brewery in St. Louis when it opened in 1991. 


The tasting included four different beers: Pale Ale, Hefeweizen, American Pale Ale, and Schwarzbier. The Pale Ale, their flagship beer, is a good example of English-style pale ale, full of flavor and a nice bitterness. Hefeweizen (unfiltered wheat beer) is actually one of the beer styles I'm not particularly fond of. This one was a pleasant surprise for me, as it uses American hops and was not so overwhelmingly aromatic. The American Pale Ale had a strong grapefruit-citrus flavor, and differs from the English style with the use of American hops. The Schwarzbier was perhaps the most interesting brew they offered. It is a black lager, combining the light crispness of lager with the smokiness of a dark beer. I brought home a sampler six pack. The oatmeal stout is pictured above.

Sunday, February 5, 2012

Foods of St. Louis

No Free Lunch is not just about recipes and cooking; it is as much about the culture around food and drink. From time to time, I will discuss regional cuisine both locally and while traveling. This weekend, Ariel and I visited St. Louis, a city with many distinctive culinary features. Today's post explores a few of these features.


The Hill
The Hill is a historically Italian-American neighborhood in St. Louis, and is home to many Italian restaurants. It was also where baseball legend Yogi Berra grew up. One of the most famous dishes to come out of The Hill is toasted ravioli - ravioli, breaded and deep-fried. This has since become a staple of St. Louis cuisine.

We had dinner at Anthonino's Taverna, an Italian restaurant with some Greek elements, as well. The Greek influence was seen with the battered pickle chips, which were served with a spicy tzatziki. I was excited to see squid ink pasta on the menu, a dish I don't often see.

Provel Cheese
Provel is one of the most ubiquitous features of St. Louis food. It is a processed cheese made from a blend of Provolone, Cheddar, and Swiss, and has a soft and gooey texture. It is a key ingredient in the classic St. Louis dish, the Steak Modiga, where it forms the base of the sauce. It is also seen on salads, and, most famously, as part of a St. Louis-style pizza.


Provel is found only in the St. Louis area, although it is actually produced in Wisconsin. As such, I brought a pound of it back home to Indiana, so it may be featured in some recipes in the coming weeks.

St. Louis-Style Pizza
Although the pizza originated in Naples in southern Italy, it is an integral part of American food culture. There are a staggering amount of regional variants, from the original pizza napoletana to the Chicago deep-dish. The St. Louis-style pizza has a very thin crust and is topped with Provel instead of the traditional mozzarella. The use of Provel changes the texture of the pizza significantly; instead of the stringiness of the typical mozzarella used on American pizzas, the melted Provel is creamy and gooey.


I'm a big fan of St. Louis pizza, and every time I have been to the city, I have eaten a pizza from Imo's, one of the most commonly seen purveyors of this style of pizza. The one seen here is topped with sausage and mushrooms.

Thursday, February 2, 2012

Quick and Easy Frittata

Happy Groundhog Day, my dear readers. With six more weeks of winter upon us, you'll have lots of time to stay indoors and cook some great food. Today's recipe is long overdue. Frittata is one of the first things I learned how to make; and it's easy and incredibly versatile. I like to think of it as a cross between an omelette and a pizza, and the result is wonderful.

There isn't much of a science to frittata. You can put whatever ingredients you have in it. In college I even made a frittata with General Tso's Chicken from the local take-out. It was pretty damn good, too. That said, don't think of your frittata as a means to clean out absolutely everything in your fridge. My advice is to keep it simple enough where each individual ingredient can still shine.


Ingredients
  • 10 large eggs 
  • 1/2 onion 
  • 4 - 6 mushrooms 
  • 1/3 pound ground pork 
  • 1 - 2 big handfuls spinach leaves 
  • 1/2 cup diced tomatoes 
  • 1/3 - 1/2 cup grated gruyère cheese 
  • Grated Parmiggiano-Reggiano 
  • Dried basil and oregano 
  • Garlic powder 
  • Salt and pepper 
  • Olive oil 

Instructions

As with potstickers, your frittata will be much more successful in a non-stick pan. For this recipe, use a large pan (mine is 11 inches across). With smaller pans, you can reduce the recipe to 6 eggs and less of everything else.

Start by heating olive oil in the pan, medium heat. Dice the onion and cook until translucent. While onions are cooking, thinly slice the mushrooms and add those in, too. Turn the heat up a bit. Once mushrooms and onions are slightly browned, add pork and brown this as well. Add spinach and cook down. When you first put the spinach in, it will look like a lot, probably covering your whole pan and heaping up, too. It shrinks a lot when cooked. Once the spinach has reduced in size, add tomatoes and stir together. Season with salt, pepper, and garlic powder. Generously add basil and oregano.


Crack the eggs into a bowl and beat with a fork. Once the above steps are completed, make sure the ingredients are evenly distributed in the pan and pour in the eggs. Next, add the gruyère. You can substitute other cheeses if you prefer, but I like the flavor of gruyère and it melts well. Stir the cheese into the mixture.


Now is a good time to turn on your broiler in preparation. Let the pan sit on the heat for several minutes, allowing the bottom to cook and solidify. Periodically lift up the cooked bottom with a rubber spatula to let the raw egg run down to the bottom and cook. Once the whole thing is starting to solidify, but the top is still runny, sprinkle a little grated Parmiggiano-Reggiano over the top and put the pan under the broiler. Cook until the top hardens and browns. Test for interior doneness by poking at it with your finger. If there is a lot of give, it needs a little more time. If the top is cooking too fast, consider moving the rack down a notch.


When done cooking, slide your spatula around the edges of the pan and underneath the frittata to loosen. With a good non-stick pan, it should come right out. Position a plate nearby, and shake the pan to slide it out. Cut into wedges with a pizza cutter or sharp knife. You want to take it out of the pan before cutting to avoid damaging the non-stick surface. This recipe should comfortably feed three, more if you have some bread with it.