Showing posts with label bread. Show all posts

Sunday, December 13, 2020

Savory Kolaches

Going to the farmer's market every Saturday was one of our favorite things to do in Bloomington. While we certainly enjoyed the produce on offer, we really went for the breakfast options. Whether that was crepes and croques at Le Petit Café, Brown County Coffee, or Aahaa Chai, there was always something tasty to be found. Our all-time favorite, though, was Sweet Claire Bakery, which always had a line around the corner. It is here we were introduced to kolaches: sweet buns with lots of different filling options. More than two years after we left town, we have greatly missed them... until now. Ariel got in touch with the proprietor and got the dough recipe, and I went to work dreaming up some fillings. We were blown away with how good the results were, and I'm excited to share them.

Kolaches originated in Central Europe, like so many other delicious things, made their way to the United States with the immigrants who loved them. Czech communities have made them especially popular in Texas. From what I can tell, the original Czech version has strictly sweet fillings, but creative American cooks have moved them in a savory direction. We came up with two fillings, loosely inspired by what we remembered from the kolaches we had in Bloomington. Both types were delicious.

The first is a braised chicken I've been calling "adobo chicken," not to be confused with the grilled version I posted last summer. This was fairly similar to my pulled pork recipe, but uses chicken thighs and tomatoes. It's a little spicy on its own, but this balances out inside the bun with. The filling is rounded out with half a hard-boiled egg. The chicken turned out very well and would also be great in a taco. Because it is a saucy filling, there were some structural problems on the bottoms, so it's important to make sure they are thick enough to hold up. It wasn't too bad, but it's something to watch out for. The second emulates a classic breakfast sandwich with sausage, egg, and cheese. The main question here was how to do the eggs. I decided to make French-style rolled omelettes and put half an omelette in each kolache. This worked out very well because they hold up well while not drying out. These kolaches turned out great. The only adjustment we would make is adding a little more cheese. 

The dough recipe is reproduced from what we received from Sweet Claire. The original recipe was given in baker's percentages, with this set to make 12 kolaches. As such, the amounts are all in grams - a little unusual for this blog. A good scale is a great addition to any kitchen. We made 6 of each type of kolache. The chicken recipe makes enough for all 12 buns, so I saved half of it for later. All in all, the results were simply fantastic, and we're already looking forward to making them again and trying some different fillings. 

Thursday, November 26, 2020

Thanksgiving for Two (Stuffing/Dressing Recipe)

2020 has been an unprecedented year in so many ways. Thanksgiving, which typically sees the highest volume of travel all year, has been particularly emblematic of how this pandemic has changed how we live our lives. Yet, there is still much to be thankful for in my life, not the least of which is the resurgence of this blog. With this 75th post of 2020, this year surpasses 2012 as the most productive year of No Free Lunch. Like many people, we stayed home for Thanksgiving but still put together a traditional feast for just the two of us. In a way it was a nice to give Thanksgiving a test run with just us before we host one day. It turned out to be a silly amount of food, but there's nothing wrong with having leftovers for a few days. In this post, I'll talk about what we had with a focus on the most iconic of Thanksgiving side dishes. 


I am, of course, talking about "stuffing," also known as "dressing." Despite the name, it's typically made in a casserole dish instead of inside a turkey. This is both safer and allows for making as much as you want. We definitely overdid it a bit and made enough for a whole family. In retrospect, we could easily have halved it and still had plenty of leftovers. Our version was loosely inspired by Kenji's recipe and Adam Ragusea's video on the topic. 


With just the two of us, I roasted a whole chicken rather than a turkey. It's not something I do often and don't yet have a lot of confidence. The age-old difficulty with a whole chicken (or turkey, for that matter) is that the breast is best at a much lower temperature than the thighs and legs. I tried Ragusea's method of cooking the chicken breast up on the stove before moving it to the oven. This was much simpler than other methods (like spatchcocking) and did the job well. This also makes it very easy to make a quick and delicious gravy in the same pan. 


We rounded out the dinner with Michael Solomonov's kale and apple salad. Ariel first made this to go with our brisket for Rosh Hashanah this year and it quickly became a family favorite. 

Of course, no Wai family Thanksgiving could be complete without party salad! It's a true Upper Midwest treat. Ariel even talked her parents into adding it to their table this year. As I hear, it went over well. I hope everyone was able to make the best of these unusual circumstances and celebrate in a safe way that will enable people to come together next year. Cheers, and happy Thanksgiving!

Friday, August 7, 2020

Shrimp Toast (麵包蝦仁)

Today, I'm pleased to present another creation from the Joyce Chen Cook Book. Shrimp toast is a Cantonese dim sum item I've had a few times in restaurants, but never thought about making at home until now. Like most of Chen's recipes, it's quite simple, but satisfying, and uses ingredients easily found in American supermarkets. Everything in the recipe stores well, so it's another good "Corona Cuisine" option. The Chinese name mianbao xiaren translates to "bread shrimp meat." Once such a thing is possible again, I think these would be great party food to pass around with some cold beers.
The texture of the cooked shrimp mixture is best described as "springy." It's quite unique to and common in Chinese food. Western recipes for ground meat dishes, like hamburgers or meatballs, often warn against overmixing to maintain a loose texture. Chinese meatballs, on the other hand, are dense and springy. The bacon is a clever shortcut to incorporating some fat into the mixture, while also adding flavor. The minced water chestnuts are a great addition, as you get little pockets of crunchiness every now and then. My only real complaint about the dish is that the bread absorbed too much oil and got a little soggy on the bottom. This could be a combination of the very basic supermarket white bread I used and my decision to rest them on paper towels instead of a rack. As such, I'd recommend the latter.

I have basically reproduced Chen's recipe, but with more detailed instructions. She only says to grind the meat with no technique mentioned. The food processor got this done efficiently. Mincing very aggressively with a knife would probably work, as well. As usual, Chen adds some MSG here, which I don't have on hand. Also notable from the book is that there is a companion recipe for shrimp balls, which use the same shrimp mixture, but formed into balls and deep fried. I didn't try that, but it would provide a gluten-free option, if you're into that kind of thing.

Thursday, July 14, 2016

Soupe à L'Oignon Gratinée

Bonne fête! Welcome to another No Free Lunch Bastille Day special. Having been busy with the move and the class I'm teaching, the blog has, unfortunately, been neglected of late. You'll now notice the third kitchen to be regularly featured premiering in this post. In the time since my last post, I've fallen back on the old favorites, including another huge batch of potstickers. There's nothing like a yearly tradition to drag me out of my torpor. My choice for this year's recipe is about as classic as they come: onion soup. 


I've been a big fan of onion soup for about as long as I can remember, yet for whatever reason, I never made it until today. In general, as much as I enjoy soups, I rarely make them and even less often feature them on the blog. This was also a great opportunity to give our new soup bowls a try. I consulted both Julia Child and Kenji Lopez-Alt's recipes, and took some inspiration from both. Onion soup very simple in terms of ingredients, but it all comes together beautifully. The wine I used was the 2013 Chardonnay from Bloomington's own Oliver Winery. The bread was, of course, the one featured on this blog.

Ingredients

Basic Soup
  • 2 lb. yellow or sweet onions, or a mix of the two (4-5 onions)
  • 3 Tbs butter
  • 1 Tbs vegetable oil
  • 1 tsp salt
  • 1/4 tsp sugar
  • 2 Tbs flour
  • 6 c chicken stock
  • 1/2 c dry white wine
  • 2 bay leaves
  • Salt and pepper to taste
  • 3 Tbs cognac (optional)
For Gratinée
  • French bread (enough to cover the bowls)
  • Olive oil
  • 1 clove garlic
  • Grated Swiss cheese, such as gruyère or emmental

Instructions

Slice the onions into thin strips. Melt butter with vegetable oil in a large dutch oven or heavy pan over low heat. I ended up splitting my onions across two pans, as in the photo. Add onions, cover, and cook 15 minutes. Turn the heat up to medium-low and add salt and sugar. Cook until golden brown, stirring frequently. For me, this took about an hour.

Onions after cooking

At this point, I combined all the onions into one pan. Add flour, stir together, and cook a few minutes. Add wine, stock, and bay leaves. Bring to boil. Reduce to simmer and cook, partially covered, about 40 minutes. When ready to serve, stir in the cognac, if using.

Soup simmered and ready to go

To prepare the toast, slice French bread and brush with olive oil. Toast until hard and crunchy. Cut garlic in half and rub on the toast.

Headed to the broiler

Transfer the soup to oven-safe bowls. Top with the toast and cover with cheese. Broil the bowls for a few minutes, until the cheese is bubbly.

Tuesday, July 14, 2015

Flammekueche (Tarte Flambée)

Bonne fête and welcome to the 2015 edition of the No Free Lunch Bastille Day special, which I think is fair to say has become a tradition here. This time, we head to Alsace for flammekueche, known in French as "tarte flambée." It translates roughly as "flame cake," but can be thought of as a thin crust pizza. Although flammekueche is not part of the "core" library of French cuisine, it is an Alsatian classic. In a way, Alsatians were the first to celebrate Bastille Day, storming the Strasbourg city hall just a week after the Bastille fell. Today, we salute their revolutionary spirit.


Alsace is one of the world's fascinating border regions, being passed from the Austrian-led Holy Roman Empire to Burgundy, to France over the years. Seized by Otto von Bismarck in the Franco-Prussian War, Alsace became a part of the German Empire until returning to France, where it has remained, in the Treaty of Versailles. Traditional Alsatian cuisine is a testament to the cultural blending that came out of this history. Where else in France is sauerkraut a central part of the cuisine? Their coq au vin is even made with Riesling. In fact, the first time I had flammekueche was in Germany.

As with many traditional dishes, my investigations turned up a lot of variation. The biggest differences are in the dough. Some use yeast and rise the dough, while others do not. Since the Wikipedia article describes it as "bread dough" I went the yeast route. There are also a variety of takes on the topping. I had decided on a mix of crème fraîche and fromage blanc, a tart fresh cheese from France. I was unable to get fromage blanc, so I am substituting fat free Greek yogurt. I also had some of the crema Mexicana left from the corn, and used that in place of crème fraîche.

Ingredients

Dough
  • 2 1/2 cups all-purpose flour
  • 2 1/4 tsp (1 package) dry active yeast
  • 1 tsp salt
  • 1 cup warm water (105-115 degrees F)
Topping
  • 3/4 cup crème fraîche (substitute crema Mexicana)
  • 3/4 cup fromage blanc (substitute fat free Greek yogurt)
  • 1 onion
  • 6 strips thick-cut bacon
  • Salt and pepper to taste

Instructions

Dough

Start by preparing the dough about 2 hours ahead of time. Mix the flour, salt, and yeast in a large bowl. Make a well in the center and pour the water in. Slowly mix the flour into the water until everything is integrated. 

Before kneading
Knead until smooth. I did this in the stand mixer. Note the dough is quite sticky compared to bread dough. 

After kneading

Transfer the dough to a large, lightly oiled bowl. Cover with plastic wrap and let rise for 1 hour. Punch down, cover again and let rise for 1 more hour. Punch down again and divide the dough in half.

Assembly

Preheat the oven to 500 degrees F. Halve the onion and cut it crosswise as thin as possible. Cut the bacon into thin strips, about 1/4 inch wide. Mix together the crème fraîche and the fromage blanc/yogurt. 

Ready to bake

Roll both pieces of dough into large, thin rectangles. Transfer to oiled sheet pans. Spread the topping mixture over both, and sprinkle onion and bacon on top. Salt and pepper to taste. Bake on lower rack for 15 minutes. Cut into squares for serving. Wine pairing would traditionally be Riesling, but Vouvray did nicely today.

Wednesday, July 1, 2015

Shredded Pork with Steamed Buns (京醬肉絲)

Today's post is inspired by two recipes I found in Peimei's Chinese Cookbook. The first recipe, the shredded pork, is transliterated jingjiang rousi. This is a classic northern Chinese dish, and as such was sort of outside my normal milieu when it comes to Chinese cooking. Peimei serves it with dan bing, the same super-thin pancakes which often wrap Peking duck. As these are quite labor intensive, I decided to save them for another day and make the much simpler sandwich-style buns in the picture. I have been dabbling with various bun recipes for a few years now, but have been waiting to perfect them before posting. These buns, by contrast, are stunningly simple, containing no yeast and requiring no raising. Peimei's recipe, called "Flower Shaped Buns," has a few extra steps to make them prettier, which I omitted.


The name translates literally to "capital city paste meat strings," but as with many Chinese expressions, brevity rules over ease of translation, and implied meaning is left out. A more accurate translation might be "shredded meat with bean paste from Beijing." Peimei goes with "Shredded Pork with Bean Sauce." I made relatively few departures from the original recipe, other than roughly doubling it. For the buns, we used butter instead of lard, and they came out just fine.


Today's recipe features a new "exotic ingredient" -- sweetened soybean paste. Just when I think I have used just about every possible fermented bean product, another one always manages to pop up. This stuff is quite thick, and has a smooth consistency and that deep umami that only fermented beans can provide. It's definitely milder than the funky fermented black beans or fermented tofu I have used in the past. Despite the name, I did not find the paste to be all that sweet, as the whole fermented bean thing tends to take over. I found it at the Asian grocery store.

Ingredients

Pork
  • 3 1-inch thick slices pork loin (about 20 oz)
  • 2 Tbs soy sauce
  • 2 Tbs cornstarch
  • 3 Tbs cold water
  • Vegetable oil for frying
  • 4 large green onions
Sauce
  • 3 Tbs sweetened soybean paste
  • 1 Tbs sugar
  • 1 1/2 Tbs water
  • 3 Tbs vegetable oil
Buns
  • 1 1/2 cup all-purpose flour
  • 2 tsp baking powder
  • 1 Tbs melted butter (substituting for lard)
  • 1 Tbs sugar
  • Sesame oil

Instructions

Shredded Pork

Cut the pork into long, thin strings. I cut each piece of pork loin into thin strips, then halved these lengthwise, as shown in the picture. In retrospect, I think going thinner is better, perhaps into 3 or 4 pieces instead. In a bowl, mix the pork with the soy sauce, cornstarch, and water. Let this marinate in the refrigerator for about 45 minutes. Cut the green onions into pieces about 2 inches long, then slice them up lengthwise into 2-4 smaller pieces. Set these aside. If you are making the buns, you can make them while the pork marinates. The recipe for the buns is set aside at the end of this post.


Heat up plenty of oil in a wok on high heat. Stir fry the pork until browned and cooked through. Set aside and clean out the wok. I found the marinade really burned onto the wok, and had to deglaze with water and scrape before moving on.


Heat up the 3 Tbs oil for the sauce, again on high. Combine soybean paste, sugar, and water in a dish and stir well. Add this mixture to the hot oil and cook for about 30 seconds. Add the pork and stir to coat. Serve with the green onion and buns and eat as small sandwiches.

Buns

Combine the flour, baking powder, butter, and sugar in a large bowl. Use your hands to mix together, then knead into a smooth dough. Cut the dough into about 20 equal pieces (for larger buns, you can do fewer). 


Flatten each piece of dough into rounds by hand, with the cut sides aligned as the top and bottom. These should be around 3 inches in diameter. Brush one half of each round with sesame oil, and fold them over into half-circles. This method is quite rustic, and they will not all end up exactly the same, but that's fine.


Place the buns in a bamboo steamer and steam for 8 minutes. As usual, we used steamer liners, but you can also put parchment paper under each bun.

Sunday, July 1, 2012

Grandpa's French Bread

I love featuring "tastes of my childhood" on No Free Lunch, and today's is perhaps more ingrained in my memory than any other. Grandpa has been making this bread for longer than I can remember. Not a day goes by that he doesn't have some in his house, and the dog wouldn't have it any other way. I vividly remember going to Grandpa's house and eating cheese toast made from this bread, with a slice of American cheese, slightly blackened in the toaster. It's also an ever-present component of Christmas Day brunch with sliced turkey and eggs. Even if you don't have the associated memories, this is a very nice bread, crusty on the outside and almost spongy on the inside, perfect with your favorite cheese.


Ingredients
  • 3 1/2 cups all-purpose flour
  • 1 package dry active yeast
  • 1 1/2 tsp salt
  • 1 1/2 cups hot water (105-115 degrees)

Instructions

In a large bowl, mix the yeast and flour. Push the flour to the sides to form a well in the center. Measure out the water, using a thermometer to check the temperature. Pour the water into the well. Circle the edge of the well with your finger, slowly absorbing the water as the flour gets mixed in. Mix everything together, forming the dough into a big blob.


Next, knead the dough. You can do this by hand or in a food processor with the bread attachment. Run the food processor for 45 seconds. This will, of course, take longer by hand.


Cover the bowl with plastic wrap and let rise for 2-3 hours. After rising, punch down, cover the bowl again and let rise for 1-2 more hours. 


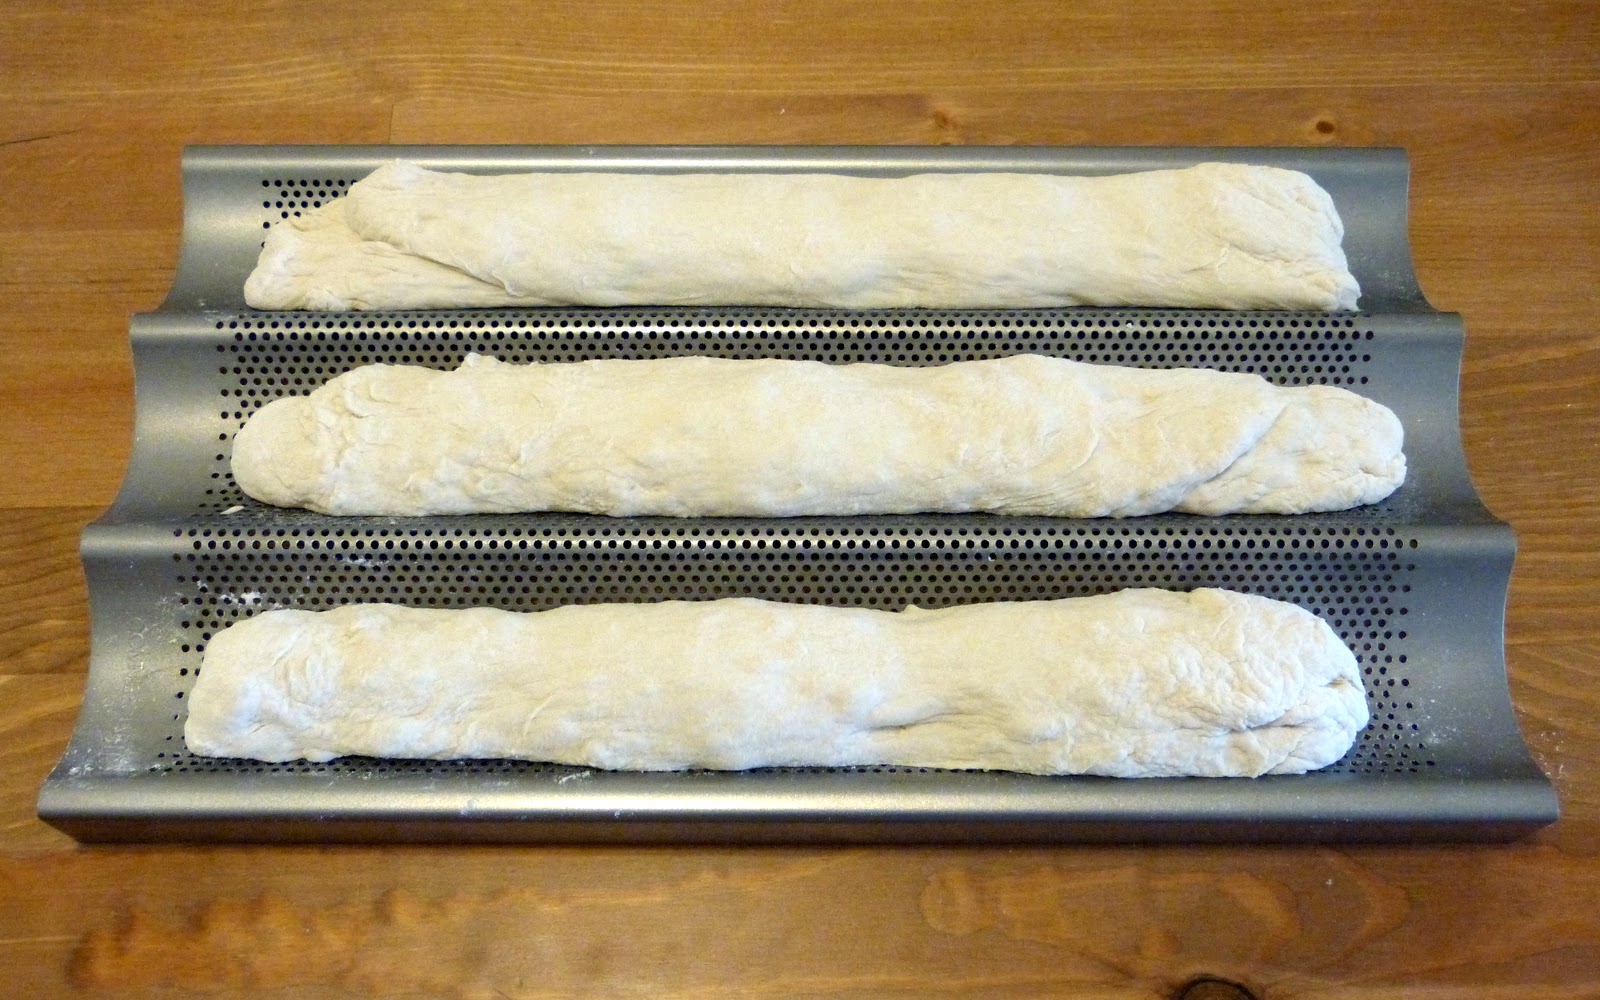
Divide and form the dough into loaves. You can either make two big ones or three small ones.  While doing this, have some extra flour on hand to spread around if things get sticky. Place the loaves into lightly oiled french bread trays. Cover with a clean cloth and let rise for one more hour. Remember to preheat the oven partway through.


Bake the loaves at 425 degrees for 25-30 minutes. Spray the loaves every 3 minutes, 3 times total.


The bread is great fresh out of the oven, but you can also put it in the fridge or freezer to keep for later. It's also a great way to serve Ariel's strawberry jam.