Friday, January 26, 2018

Birthday Special 2018

Happy birthday, Ariel! For the cake this year, I decided I had to step it up a little. I returned to the same recipes I used for 2015's cake. This was Mark Bittman's golden layer cake and chocolate buttermilk frosting. In that cake, I just poured the entire batter into a 9x13 pan. This time, I did what was actually prescribed by Bittman -- two 9-inch round cake pans. The actual layer cake construction was not as difficult as I was expecting. Bittman recommends placing the bottom layer upside-down so that the flat bottoms go in the middle of cake. There was still a gap around the edge, but I managed to fix this by adding more frosting and pressing down on the cake. Overall, I do think the improvement in presentation is worth the extra effort over a sheet cake. Since the cake becomes taller, frosting the sides is actually easier with the layer cake. 


For the decoration, we have the triumphant return of the ship cake! I was inspired by the 15th-16th century carrack, the ship that built the Portuguese empire. As always, I used the Betty Crocker cake decorating tubes, but I remain dissatisfied with them. I may have to investigate other options for next year.


The birthday feast included eggplant Sichuan style, potstickers, and Kenji's crab rangoons. If you've never made crab rangoons before, it's quite easy, and I highly recommend Kenji's recipe, which is heavier on the crab. I used imitation crab, which I maintain is one of the world's most underrated ingredients. 

Monday, January 15, 2018

Pulled Pork

If I had to choose one favorite cut of meat, it would probably be pork shoulder. It's a terrifically versatile cut that's popped up quite a few times on No Free Lunch, and it's usually fairly inexpensive. You can easily find a large shoulder roast (sometimes called a "Boston Butt") at most grocery stores, or at Sam's Club for a few dollars a pound. I generally separate the roast into two sections. I cut right at the edge of the shoulder blade to have a smaller bone-in roast and a boneless section that can be sliced into long strips for char siu. With the bone-in section, I either trim the meat off for grinding (the fat content is perfect for potstickers) or cook it whole, as I've done with this pulled pork recipe. If you trim off the meat, you can save the bone for making soup.


I have been a fan of pulled pork for years, but for some reason, I never tried making it at home until a few months ago. I did a quick survey of various braised pork recipes online to get a general idea, and devised this one myself. It is excellent in tacos, but can also be eaten with rice and some roasted vegetables. It takes well to freezing, and when I teach evening classes, I like having food ready to go in advance.

Chipotles in adobo are a key ingredient in this recipe. These are smoked jalapeños in a brown sauce, usually found in a can. I've been experimenting with these for a while, and most frequently use them as part of a marinade for grilled chicken. On their own, chipotles are very spicy, so you do need to be careful to add them in moderation. I've had no problem getting them from a regular supermarket. For the beer, I used a dark Belgian-style brew, but you can really use anything decent. The first time, I used a pilsner, and it turned out well. Although I haven't tried it, I would think something like Negra Modelo would be a great, affordable choice that's somewhat on-theme.

Ingredients
  • 1 bone-in pork shoulder roast, about 4-5 pounds
  • Vegetable oil
  • Limes for serving
  • Salt to taste
Rub (approximate)
  • 2-3 tsp salt
  • 1 tsp black pepper
  • 2 tsp cumin
  • 2 tsp paprika
  • 1 tsp smoked paprika
  • 1 tsp ground coriander
Braising liquid
  • 1 yellow onion, diced
  • 4 cloves garlic, smashed
  • 1 bottle of beer
  • 1 orange
  • 4 chipotles in adobo sauce, chopped
  • 1 bay leaf
  • 1 tsp oregano
  • 2 tsp dark soy sauce
  • Chicken stock as needed

Instructions

Preheat oven to 350 degrees F. Heat a little vegetable oil in a dutch oven or other similar vessel on medium-high heat. Rub the pork all over with salt and the rest of the rub. Brown the pork on all six sides, then set it aside.

Pork during browning

Add the onion and garlic to the pan and brown for a few minutes. Deglaze with the beer. Squeeze out the orange into the pan. Add the chipotles with a bit of their sauce, bay leaf, oregano, and soy sauce. Return the pork to the pan. Top up with chicken stock so that the pork is almost completely covered with liquid.

Ready to go in the oven

Cover the pan and transfer to the oven. Cook for about 3 hours, until fork tender. 90 minutes in, check on the roast and flip it over. Remove the pan from the oven. Take out the pork and place on a plate.

After 3 hours of braising

Use two forks to pull the meat apart into shreds. The meat should come right off the bone and tear apart easily. Large chunks of fat can be discarded.

Removing the grease

Transfer the pork to a ziploc bag or other container and refrigerate for later. Place the entire pan of sauce in the refrigerator and chill for a few hours, or overnight. The excess grease will congeal on the top of the sauce and can be easily removed. Remove the bay leaf.

Ready to serve

When ready to serve, add the meat back to the pan and bring up to heat on medium heat. Stir to thoroughly coat the meat with sauce. Salt to taste. Serve with lime wedges to squeeze on the pork. Leftover pork can easily be frozen for later use.

Tuesday, January 2, 2018

"Potsticker" Sandwich

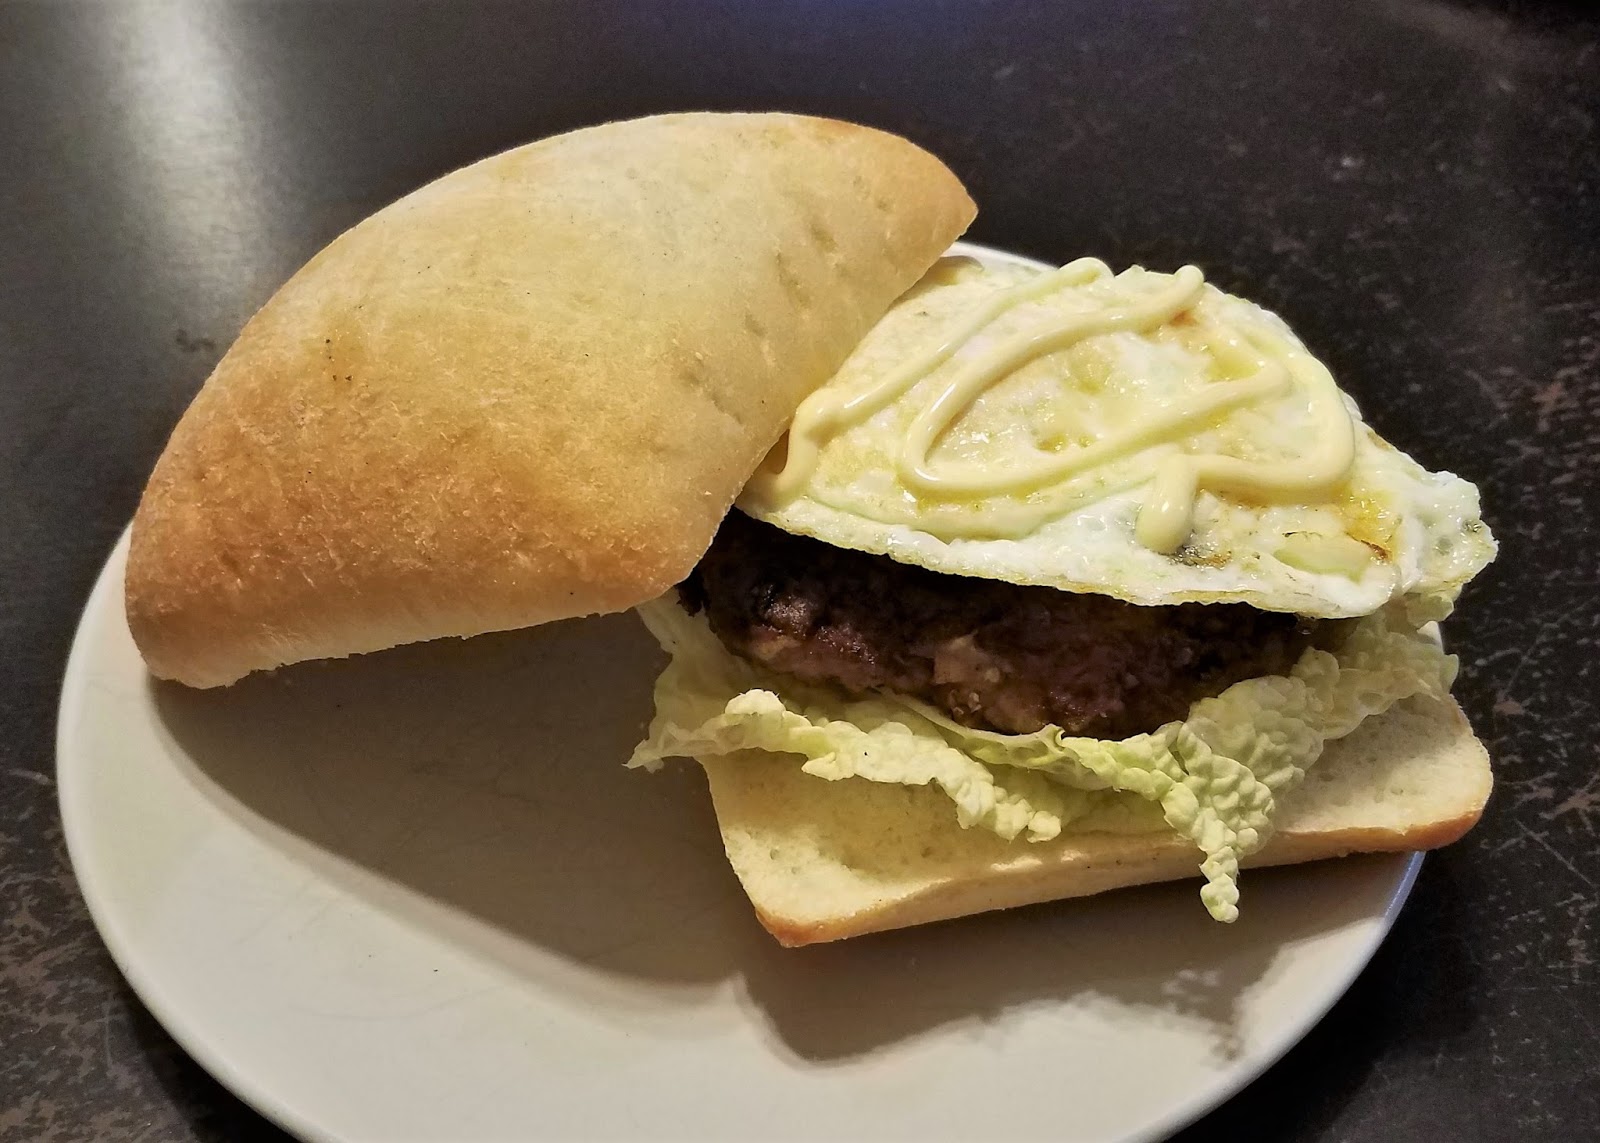
Happy New Year, everyone! As 2018 arrives, so does the 6 year anniversary of No Free Lunch. Sadly, 2017 was the leanest year in its illustrious history, though I've emerged from it as Dr. Wai. When I started No Free Lunch, I was midway through my first year of graduate school, a year where I learned a lot both in the classroom and in my evenings churning out seventy-four blog posts. It's still fun to go back and see how my approach has evolved. I am very proud of the few recipes I did manage to post last year, including one of my best Chinese dishes yettwo "modernized" takes on Jewish holiday traditions, and a fantastic blind dive into Pei Mei's Chinese Cookbook. I hope 2018 will be a fruitful year for this blog, and I already have the next post in the works. My new year's resolution is that I will be less of a perfectionist when it comes to recipes and give you a few more works in progress.


For the first post of the new year, I've got a real oddball that turned out incredibly well. Making a huge batch of potstickers can be time consuming and tiring. Sometimes you run out of dough, and have a little filling left, but not enough to justify another batch of dough. Sometimes you just get hungry. I have the solution: potsticker sandwiches. I've made these here and there over the years, but doing this post made me sit down and think about how to make them as delicious as possible, and I believe I have achieved it. Crunchy cabbage, gooey egg, and savory potsticker filling combine beautifully into a satisfying, self-contained meal. 

The ingredients are pretty mundane, aside from the potsticker filling that forms the center of the sandwich. I used ciabatta rolls for the bun here. While good, I think they are a little too robust for this sandwich, and a regular hamburger bun or the large-size King's Hawaiian would be best the way to go. For the greens, anything you have on hand is fine, but if you are using my potsticker recipe, you'll have some napa cabbage on hand. Just tear off some of the green leafy parts. I felt the sandwich needed some lubrication, and Japanese mayo (Kewpie is the most common brand) fits the bill nicely. If you've never tried it, I highly recommend giving it a go.

Ingredients (per sandwich)

  • 4 oz. leftover potsticker filling (see my recipe, "Potstickers, the Hard Way")
  • 1 Tbs panko
  • Flour for dredging
  • Vegetable oil
  • 1 egg
  • 1 bun of your choice
  • Cabbage or lettuce leaves
  • Japanese mayonnaise (Kewpie)

Instructions

Note that the photos here are for two sandwiches, which can easily be made in a single pan.

Mix the panko into the potsticker filling. Press the filling into a disk, about 3 1/2 inches across. Spread a little flour out on a plate and dredge the disk on both sides. 


Heat a little vegetable oil in a frying pan on medium heat. Fry the meat disk for a few minutes on each side, until well browned and cooked through. Set aside when done.

This pan from IKEA replaced the old, battered potsticker pan

Wipe out the pan and add a bit more oil. Fry the egg to your preference. For sandwiches, I like mine over medium, so that the yolk is still soft, but does not run out when you bite into it. While the egg is cooking, slice the bun in half and warm it up in a toaster oven.

To assemble the sandwich, squirt a little mayo on the bottom bun, add the greens, then the meat. Top with the egg and some more mayo.

Thursday, December 14, 2017

Lox

Happy Hanukkah, everyone! I actually took the photos a few months ago, but hadn't written up the post until now. It seems like as good a time as any to discuss this breakfast favorite. Lox and bagels are well-known component of the Jewish-American culinary tradition. That being said, the concept of cured salmon is not new to me, though I knew it from the Scandinavian version, called gravlax. Whle the particulars of the seasoning are different, I am a fan all the same.


This particular recipe is adapted from one from a friend of Ariel's family. It's remarkably easy, and quite economical. I find the regular farm-raised salmon from Sam's Club produces excellent lox for a low price. There is one "exotic" ingredient in this recipe: liquid smoke. It's not exotic in the sense of it being hard to find, as most supermarkets carry it. However, it's a fascinating product, made from condensing water vapor produced by burning wood. I like to put a little in homemade barbecue sauce, but otherwise, I'm a novice when it comes to liquid smoke.

Ingredients
  • 1 Salmon fillet
Per pound of salmon:
  • 2 Tbs salt (non-iodized)
  • 2 Tbs sugar
  • A few drops liquid smoke

Instructions

Rinse the salmon under cold running water and pat dry with paper towels. If your salmon has skin on it, make sure to remove the scales first. This can be done by scraping a table knife against the scales under running water.


Add liquid smoke to salt and mix well. Mix with the sugar. Rub the mixture all over the salmon, making sure to cover both sides of the fillet. 


Wrap the salmon in plastic wrap and place in a gallon-size bag. You may need to fold it in half. Place in refrigerator for six days. Flip the fish over halfway through.


After the curing is done, remove from the plastic wrap and rinse thoroughly under cold running water. Pat dry. If the lox is too salty, you may need to rinse it more.

The whiskey bottle reflection in my caidao
can only mean one thing: char siu!

Slice the salmon at an angle into thin slices. A long, sharp knife is essential. My trusty Chinese caidao did the job here, but any good chef's knife works well.


The lox will keep in the refrigerator for several days, and also freezes well. Serve with bagels and cream cheese. Tomatoes are also a classic accompaniment.

Monday, October 23, 2017

Eggplant Sichuan Style (魚香茄子)

This is a post that's been a long time coming. I think back to five years ago, when I would dig something out of the fridge, make whatever came to mind, and throw together a post. I don't do that anymore, and I've become something of a perfectionist when it comes to my recipes. I've made this dish several times over the last year or so, and I finally feel it's ready to see the light. I based this recipe on Peimei's version, with some adjustments for clarity, accessibility, and my own (garlic-favoring) taste.


The name yuxiang qiezi directly translates to "fish fragrant eggplant." As an aside, the character 香 (xiang) is the "hong" in Hong Kong, which means "fragrant harbor." As I understand it, the sauce in this dish was originally associated with fish, but substituted for more readily available ingredients, such as eggplant. Over the last few years, I've tried many versions at local Sichuanese restaurants in both Bloomington and Lafayette, and I often use it as a benchmark when trying a new place. On English menus, it's often called "eggplant with garlic sauce," but to make sure, 魚香茄子 is a Chinese word worth learning!

The stars of the show here are the eggplants themselves. You want to use Chinese eggplants, which are longer and thinner than regular ones. I got the pictured specimens at the farmers' market, but most Asian stores have them. Try to select firm eggplants of similar width. As with the other Sichuan dishes I've done, doubanjiang (spicy bean paste) -- is featured here. Usually, I recommend toning it down to a desired heat by mixing with Koon Chun bean sauce. I generally go half and half, as stated in the ingredient list, but for true-blue Sichuan style, you'd want to use the full 2 tablespoons of the hot stuff.

Ingredients

  • 1 1/2 lb. Chinese eggplant (about 4 eggplants)
  • 2 tsp ginger, minced
  • 4 large cloves garlic, thinly sliced
  • 1 Tbs hot bean paste (doubanjiang)
  • 1 Tbs Koon Chun bean sauce (adjust ratio of bean sauces to desired spiciness)
  • 4 Tbs light soy sauce
  • 1 Tbs black vinegar
  • 2 tsp sugar
  • 1 cup stock (chicken, pork, or seafood)
  • 1 Tbs sesame oil
  • 1 Tbs cornstarch
  • Handful green onion, chopped
  • Vegetable oil

Instructions

With this dish, it helps to get all your ingredients ready ahead of time. Remove the ends of the eggplant and cut into 1 1/2 to 2 inch long segments. Quarter each piece lengthwise. You should end up with roughly "thumb sized" pieces (Peimei's words). 


Heat oil in wok on high heat. Working in batches, stir fry the eggplant until well browned on all sides. Be careful not to crowd the pan. I recommend 3 batches for 1 1/2 lb. of eggplant. When each batch is done, set aside in a paper-towel lined bowl or plate. You will need plenty of oil, as eggplant is highly absorbent. When done, use paper towels to press excess oil out of the eggplant.


Add more oil to pan and briefly cook the ginger and garlic, just a few seconds. Add both bean sauces and cook a few more seconds while stirring together. 


Add the vinegar, sugar, stock, and sesame oil. Bring to a boil and return the eggplant to the pan. Cook, stirring frequently, until the sauce reduces by about half. Mix cornstarch in a bowl with a little water to form a slurry. Add cornstarch mixture to the sauce and stir to combine. 


Transfer to a serving bowl and mix in green onions. Serve with rice.

Wednesday, September 20, 2017

Braised Brisket for Rosh Hashanah

Tonight was the start of Rosh Hashanah - the Jewish new year. We usually have brisket twice a year, the other occasion being Passover. Ariel's always used the same family recipe, and it's been no secret that I'm not really a fan. While I do think ketchup has some interesting and tasty applications (see lovers' shrimp and sweet and sour pork), it just doesn't work for me in brisket. This time, though, I was asked to make the brisket. While I certainly respect tradition, I was excited to strike out on my own. 

Although I had an overall flavor profile in mind, I had never cooked this cut before, so I did some research ahead of time (Daniel Gritzer's article and accompanying recipe was a helpful resource). Brisket is unique in that it is both tough with connective tissue, but also is quite lean, a combination that requires care. The consensus seems to be that all of the cooking must be at low heat and covered. 


I wasn't originally going to blog this one, but it turned out so well that I thought it worth a short post. Because of this, the recipe is not as precise as usual. This is one dish where precision isn't particularly important, and I didn't measure at all. I went for a classic slow-cooked beef style and it ended up tender but still moist with a very deep, flavorful sauce. Our holiday meal also included matzo ball soup, challah, and the traditional apples and honey.


Ingredients
  • One piece beef brisket (mine was about 2 lb. - on the small side, but you can easily scale this up)
  • 4 carrots, sliced into small chunks
  • 3 stalks celery, sliced
  • 1 1/2 medium yellow onions, diced
  • 4 cloves garlic, smashed
  • 1 cup dry red wine
  • 1 14.5 oz. can whole peeled tomatoes
  • Chicken stock, as needed
  • Splash of dark soy sauce
  • Splash of light soy sauce
  • 1 Tbs dijon mustard
  • 1 sprig fresh rosemary (can substitute dried)
  • A few sprigs fresh parsley
  • 2 bay leaves
  • Flour or Wondra for thickening
  • Vegetable oil
  • Salt and pepper

Instructions

A good choice of cooking vessel is needed. The optimal choice is something we can use to brown on the stovetop, cover, then transfer to the oven. A lid is helpful, but foil can be used. A large dutch oven or saute pan that can fit your brisket works well. 

Ahead of time, prepare the vegetables as listed. Preheat the oven to 300 degrees F. Heat some oil in the pan, enough to cover the bottom. Pat the brisket dry and salt and pepper both sides. With the pan very hot, sear the brisket on both sides for a few minutes until well browned. Do your best to ensure good pan contact for an even sear. Set the brisket aside. 

Next, saute the carrots, celery, onion, and garlic. Add a little salt and pepper. If your pan is large enough, this can all be done at once. When the vegetables have softened, deglaze with wine. Let this cook down a little. While that is happening, transfer the tomatoes to a bowl and smash them up with your hands. Add to the pan. Return the brisket to the pan and add enough chicken stock to mostly cover the meat. Add soy sauce, mustard, and herbs. Stir these in.

Cover the pan and transfer to the oven. Let cook for about 3 1/2 hours, though this may vary depending on the size of the brisket. I flipped it over halfway through. 

Once the slow-cooking is complete, take the brisket out and let stand about 30 minutes. Use a slotted spoon or spider to remove the vegetables. Set these aside in a bowl. While the brisket is resting, reduce the sauce on the stove. Add a thickening agent to your taste. Whisking Wondra into the sauce works well, though you can also use a flour slurry. Taste the sauce and add salt and/or pepper to taste. I only needed a bit of pepper at this point. Turn off the burner and leave the pan there.

The brisket at serving

Thinly slice the brisket across the grain. Return the brisket slices and the vegetables to the sauce. Mix together to coat the meat, cover, and let stand for 30 more minutes before serving.

Notes

If you want to adjust this dish for Passover, a few substitutions or omissions need to be made. Specifically, the more processed ingredients won't work, as soy sauce contains wheat and mustard contains corn syrup. I like soy sauce in a braised or marinated dish (my usual mix of dark and light) for the color and savory flavor, but I don't think omitting them would break the dish. One could also use dry mustard in place of dijon mustard. Of course, flour as a thickening agent needs to be replaced by something like potato starch. 

Friday, July 14, 2017

Grilled Leg of Lamb Kebabs

Bonne fête, folks, we've made it to another Bastille Day. I struggled a little with what to make for this dearest of No Free Lunch traditions, and ended up settling on a recipe that's been overdue on the blog - a Julia Child-inspired leg of lamb. I've been making this with some regularity for the last two years, and it even made a pictorial appearance in the 2016 birthday special. I believe Child's original recipe is for a whole butterflied leg of lamb (for which this marinade would do nicely), but I generally make it into kebabs. Although kebabs might be stretching the theme a touch, let me remind you that less than 12 years after the storming of the Bastille, Egyptian Mamluks were recruited into the French army, and would eventually become part of Napoleon's Imperial Guard cavalry. I'm calling it close enough.


I must make an admission here in the ingredients section. The lemon juice completely slipped my mind when making the marinade today. If you do happen to be lacking lemon juice, I can report the lamb is still excellent. However, I normally include it, and it does add a nice element. This was also a great opportunity to use some fresh rosemary we've been growing on the deck, and while dried will do the job, it doesn't quite compare with the fragrance of fresh. Finally, let's talk about soy sauce. If there's anything food-related I could possibly claim to know more about than Julia Child, it might just be Chinese fermented bean products. For the uninitiated, Chinese soy sauce comes in two varieties: dark and light. Dark soy sauce is, as the name suggests, very dark, a little viscous, and will dye anything it comes in contact with a lovely dark brown, including your shirt. It's great for marinades and stews, but a little goes a long way. Light soy sauce is the "default" Chinese soy sauce and is typically used for saucing stir fried dishes, where a more delicate touch is required. I often mix the two, as I've done here.

Ingredients
  • 2 lb. boneless leg of lamb
  • 4 Tbs. olive oil
  • 3 cloves garlic, grated or minced
  • 3 Tbs. Dijon mustard
  • 1 Tbs. dark soy sauce
  • 1 Tbs. light soy sauce
  • 1 sprig fresh rosemary (about 1 tsp.), chopped
  • 1/2 tsp. dried oregano
  • 3 Tbs lemon juice
  • 1 large onion

Instructions

For kebabs, cut the lamb into small chunks, about 1 to 1 1/2 inch square. Trim fat as needed, as the large chunks of fat can be tough. Transfer the pieces to a gallon bag.


Combine the olive oil, garlic, mustard, soy sauce, rosemary, oregano, and lemon juice. Mix well into a loose paste and pour over the lamb. Mix thoroughly to coat the meat. Transfer to refrigerator and marinate for a few hours.


Cut the onion into small pieces, about an inch square. Toss with a little olive oil. Thread the lamb on skewers, alternating with onion pieces. This will make about 4 skewers.


Grill on high flame until well browned on all sides and cooked to preferred temperature. Turn frequently for even browning. I generally keep the hood open on a gas grill to avoid overcooking.

Thursday, July 6, 2017

Minced "Pigeon" in Lettuce Cups (生菜鴿鬆)

This is one post I'm very excited about. I have flipped past this recipe many times while looking through Pei Mei's books, and had not given much thought until recently. It's called "Minced Pigeon," after all. After trying some excellent versions of it in the Bay Area recently, I decided to give it a go, and I'm so glad I did. I'd venture to say this is almost a perfect dish. It really has it all: three meats, four vegetables, mushrooms, and noodles, all wrapped up in crunchy lettuce leaves. It comes together terrifically, and this is one I'll certainly be making again.


Pei Mei's recipes are almost universally simple. They all fit on one page, with a maximum of about four steps. That being said, this one has a lot going on. As usual, I made some adjustments to the recipe. The main change is replacing the pigeon with chicken thighs (this substitution is in the original recipe). Another big one was reducing the amount of noodles by about half. She recommends using water chestnuts, with bamboo shoots as a substitute, but I went for a mix of both. The Chinese name, shengcai ge song, translates to "lettuce pigeon mince." For the last character, I had to consult dad and grandpa, but overall this was another straightforward translation.


The new exotic ingredients in this recipe are the thin rice noodles. These are often called "rice sticks." There seems to be some variance in the width of the noodles, and I went with the thinnest ones I could get. I haven't tried them in anything else, but my guess is they would work pretty well in soup or pan fried. It's worth mentioning the chicken liver as well, since I've only used them once before. I bought a tub of them, and only used 4. The rest become a fantastic pâté using Jacques Pepin's recipe.

Ingredients
  • 3 oz. (approx.) thin rice noodles
  • 1 lb. boneless chicken meat
  • 3/4 lb. boneless pork shoulder
  • 4 chicken livers
  • 1 onion (about 1 1/2 cup diced)
  • 8 dried black mushrooms
  • 1 8 oz. can water chestnuts, drained and chopped
  • 1 8 oz. can bamboo shoots, drained and chopped
  • 1 cup green peas
  • Vegetable oil
  • Iceberg lettuce leaves
Marinade
  • 1 Tbs. light soy sauce
  • 2 tsp. salt
  • 2 egg yolks
  • 4 tsp. cornstarch
  • 1 tsp. sugar
Seasoning Sauce
  • 2 Tbs. light soy sauce
  • 2 Tbs. chicken stock
  • 2 tsp. cornstarch
  • 2 tsp. salt
  • 2 tsp. sesame oil
  • 1/2 tsp. black pepper

Instructions

Soak the mushrooms in warm water for about 30 minutes. The mushrooms will float, so use something to weigh them down and keep them in the water. When done, discard the stems and dice the rest.


While the mushrooms soak, prepare the meat. Trim off excess fat from the chicken and pork, and mince into small pieces, about 1 cm. square. Mince the chicken livers and combine all three meats in a bowl. Add all marinade ingredients and set aside for about 10 minutes.


Heat a few inches of vegetable oil in a wok on high heat. Break up the noodles into chunks that will easily fit in the wok. Once the oil is very hot, carefully place the noodles in the oil. The noodles will immediately and dramatically puff up. Flip over to puff the other side, and set aside to cool. Do this for all the noodles. Allow the oil to cool a bit and transfer to a container. We will use the oil to stir fry the other ingredients later.


In batches, stir fry the marinated meat mixture on high heat until cooked through and browned. I did this in three batches. Set aside when done. Stir fry the diced onion for a few minutes, then add the mushrooms, water chestnuts, and bamboo shoots. Mix all seasoning sauce ingredients in a bowl. Stir fry another minute or two, then add the meat, peas, and sauce. Stir together.


Crush the fried noodles into small pieces. Pour the meat and vegetable mixture over the crushed noodles to serve. Serve with the lettuce leaves, which can be used to wrap the mixture.