Tuesday, January 31, 2012

Pan-Roasted Drumsticks

I'm very excited about today's recipe, because it is the first on No Free Lunch to feature one of my favorite cuts - the chicken leg. You can substitute any other part of the chicken here if you like, but there's something fun (and delicious) about going a little medieval and biting into the juicy leg. This recipe is as easy as it gets in the world of chicken preparations. Pan-roasting in this way cuts down on cooking time, useful if you are really hungry, and also makes it easy to prepare a pan gravy with some chicken stock after you're done.

Another great thing about this meal is that it's very economical. I had a bowl of rice on the side and a glass of 2009 Borsao Garnacha at $6.99 a bottle. With the chicken only $.99 a pound, I would be hard pressed to say this filling and tasty meal cost more than $2.00!


Ingredients
  • 3 chicken legs
  • 1/4 tsp salt
  • 1/4 tsp black pepper
  • 1/4 tsp smoked paprika
  • 1/4 tsp garlic powder
  • Olive oil

Instructions

Preheat oven to 400 degrees. On a plate, mix the seasonings for the dry rub together. Sprinkle and rub the seasoning over each drumstick. Heat olive oil in a pan on medium-high heat. Make sure you're using a pan without any plastic parts, because we'll be putting the whole pan in the oven later.

Once the oil is hot, put the drumsticks in the pan. Fry until the outsides are browned and the skin crisps a bit. Turn the chicken with tongs to make sure each side gets browned.


Place the pan in the oven and roast until the chicken is cooked through. Be careful, as the pan will become very hot. You can check periodically by poking with a sharp knife close to the bone. If the juice runs clear, the chicken is done. If it runs red, put it back in the oven. Roasting will take about 20 minutes, less for smaller pieces. Robert Irvine would say that slitting your chicken shows you aren't confident in your cooking. He is right. But here we are cooking at home for ourselves with no one to impress. Once you get used to cooking times and your own oven, you will build confidence.

Sunday, January 29, 2012

Chicken Tikka Masala

Chicken Tikka Masala is one of the most popular Indian dishes worldwide, especially in Britain. The origins of the dish are unclear, but one story says it originated in an Indian restaurant in Scotland. Everyone has their own recipe for Chicken Tikka Masala, and I devised my own after some extensive research. What everyone does agree on is the basic construction of the dish - chicken tikka and a tomato cream sauce. Chicken Tikka  is a an Indian dish of marinated chicken pieces roasted in a Tandoori oven. Of course, I don't have one of those, so I substitute my handy broiler.


The chicken tikka by itself is very tasty, and I encourage you to take a bite before submerging it in the sauce. Overall, you'll notice that the flavors are a lot more nuanced than the quick-and-easy chicken curry I did before. This is a dish that is one must nurture, and it is well worth it. In terms of ingredients, this is by far the most sophisticated recipe to appear on No Free Lunch so far. Don't be intimidated, however, by the long list of spices. This is by no means a definitive recipe; go with what you have if you're missing something here or there. That said, the flavors come together beautifully - the acidic citrus from the lemon, the fragrant cinnamon, the spicy cayenne pepper, and all the rest make for a delicious treat.

Ingredients

Chicken Tikka
  • 2 split chicken breasts
  • 1 cup plain yogurt
  • 2 tsp cumin
  • 1/2 tsp cayenne pepper
  • 1 tsp cinnamon
  • 1 tsp coriander
  • 1/2 tsp cardamom
  • 1 tsp black pepper
  • 2 tsp salt
  • 1/2 lemon

Tomato Cream Sauce
  • 2 cloves garlic, minced
  • 1/2 onion, diced
  • 1 cup crushed tomatoes
  • 1 cup cream
  • 1 tsp coriander
  • 1 tsp cumin
  • 1 tsp turmeric
  • 2 tsp paprika
  • 1 1/2 tablespoons butter

Instructions
  
Cut the bone and skin off the chicken, then cut into small pieces, about an inch a side. Don't be afraid to get your hands dirty here, it's messy work. Combine the yogurt, spices, and chicken in a large bowl or Ziploc bag. Squeeze the lemon juice into the bowl and mix thoroughly. Cover and refrigerate for one hour. Use this time to cook some basmati rice and to get the sauce started. It is worth noting here that due to the shape of the grain, basmati rice only takes about 15 minutes to cook fully.


Once the chicken is done marinating, place the pieces on a sheet pan and shake off excess marinade. Broil until cooked through. Since we cut up the chicken into small pieces, this takes less than 10 minutes. You may want to flip the chicken after a few minutes to cook evenly. The marinade will keep the chicken juicy and tender.


Melt butter in a large pot on medium heat. Add the onion and garlic and sauté until onions are softened. Add the spices and stir. Pour in the crushed tomatoes and simmer for a few minutes. Stir in the cream. The sauce will now take on the brownish-orange color we all know and love. Simmer and reduce for about 10 minutes, then add the chicken pieces. Taste the sauce and add salt and pepper as needed. Simmer for a few more minutes all together. Serve with basmati rice. A great drink accompaniment is an English dry cider.

Saturday, January 28, 2012

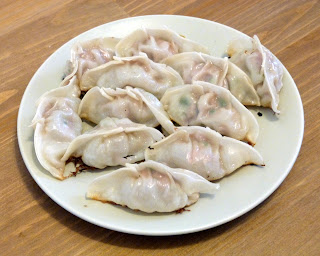
Potstickers (鍋貼)


As promised, No Free Lunch is celebrating the beginning of the year of the Dragon with a Chinese classic. These aren't the greasy, overcooked dumplings you get at your local Chinese buffet. Guotie, which actually does translate to "potstickers," are another food that brings me back to dinners at Grandpa's house when I was little. We sometimes ate these in the same meal as the famous macaroni casserole.

I did consult Grandpa before making these, and discovered there isn't a set recipe, just pork and some kind of vegetable for the filling. They keep very well frozen, and Grandpa and Grandma sometimes make them by the hundred. They also make their own wrappers, which I can tell you makes the best dumplings. I use wrappers from the grocery store here; let's learn to walk before we run. This recipe makes about 75 dumplings.


Ingredients
  • 2 pounds ground pork
  • 1 bunch green onions, chopped
  • 2 tablespoons chopped chives
  • 1 large egg
  • Salt and pepper
  • Potsticker wrappers
  • Vegetable oil

Instructions

First, make sure you have the right wrappers. Potsticker wrappers are round and slightly thicker than the square wonton wrappers. You can likely find both types of wrappers in the freezer section of your grocery store.

To prepare the filling, combine pork, green onions, chives, and egg in a large bowl. Add salt and pepper liberally (2 pounds is a lot of meat). Mix well. Prepare a large surface to make the dumplings. We'll need a small bowl of water and something to put the dumplings on - I use a large, non-stick sheet pan. I also enjoyed a bottle of beer while doing this, but that's up to you.


For each dumpling, use a fork to place a little of the meat mixture in the center of the wrapper. You'll soon get a feel for how much to put in. Too much, and the you will have trouble folding the wrapper. Too little, and the pocket you form won't be filled. Next, dip your finger in the water and wet the edge all around the circular wrapper. Fold it over, forming a half-moon, and squeeze around to seal. The last step is to fold the edge back on itself 2-3 times at the top of the dumpling. This forms a natural "bottom" so the dumpling can stand up. As you complete each dumpling, line them up on the sheet pan so that they don't touch. If you aren't going to eat all the dumplings today, slide the entire pan into the freezer. Once the dumplings harden, you can safely transfer them to a plastic bag without risk of them sticking together.


To cook the potstickers, make sure to use a non-stick skillet. I have previously written about how every great dish is preceded by failure. Trust me, use non-stick here. Add a little oil to the pan, then a little water, and heat on medium-high. The key here is to get the right dumpling to water ratio. Don't be tempted to add too much water, or the dumplings will become soggy. Just enough to cover the bottom, about 1/8 inch. 


Once the oil/water is hot, place dumplings in the pan. You can put them close together, even touching. This will also ensure you don't have too much water. Cover the pan immediately. As the dumplings steam, they will absorb the water, leaving only the oil in the pan. Cook until the bottoms are nicely browned and crispy. Once the water is absorbed, you can uncover and periodically lift up one to check the bottoms. If you prefer, you can also boil the dumplings for a different texture; these are known as shuijiao - water dumplings. Potstickers are usually served with a soy and vinegar sauce.

Thursday, January 26, 2012

Beef Stroganoff

It's been something of a busy week for me, but with Thursday upon us, No Free Lunch has returned. Regular readers may also notice that I've added a category "cloud" on the sidebar to help you navigate the recipes. There's also a navigation bar at the top, which will fill up as I add new pages.

Beef Stroganoff is definitely another food I've been eating my whole life, and it has long been one of my favorites. Originally a Russian dish, stroganoff has made its way around the world. It's a great use for a cut of meat that isn't flavorful enough to stand on its own as a steak.


Ingredients

  • 1 large sirloin steak
  • 1/3 - 1/2 onion
  • 6 small mushrooms
  • 2 tablespoons butter
  • 1/4 cup beef stock
  • 8 oz sour cream
  • Salt and pepper
  • Garlic powder

Instructions

Remove the fat from the side of the steak, then cut into thin slices. This is one case where the steak can still be a little frozen, so that it's easier to cut. Season with salt and pepper if desired. Melt butter in a frying pan on high heat. Brown the beef slices on both sides. Work in batches as to not crowd the pan. Set the beef aside.


Slice mushrooms thinly and dice onion. Turn heat to medium and sauté onions for a few minutes, then add mushrooms. When mushrooms are browned on both sides, deglaze the pan with the beef stock. Scrape the beef bits off the bottom of the pan. Add the sour cream, and stir to integrate. Add salt, pepper, and garlic powder to taste. Simmer for a few minutes, then add the beef back into the sauce. Simmer a bit more.


Serve over potatoes, egg noodles, or rice. Many variations of this dish exist. For example, you can add some minced garlic with the onion. Some prefer not to add the mushrooms. As usual, when it comes to the kitchen, it's all up to you!

Tuesday, January 24, 2012

Chicken Economics

I have always been a dark meat eater. I believe the leg is the best part of the chicken; it has it's own handle! As such, dark meat (legs and thighs) are generally the only chicken I buy. Last week, I went to Sam's Club to stock up on ingredients for Pub Week. I bought two packages of chicken, one dark and one white. The dark meat was a six pound package of legs at $1 per pound. The white meat was a seven pound package of split chicken breast. Having never bought white meat before, I was shocked to discover it was $2 per pound, double the price of the legs.

Why is this? Simply, the majority of Americans prefer the taste of white meat, so the demand is higher. This is also why a lot of dark meat gets exported to Russia and other countries. In particular, the most popular option seems to be the "boneless skinless breasts" which, at Sam's Club, come individually plastic wrapped. For some reason I find this a little disquieting. I went with the bulk packaged bone-in chicken.

Now in possession of several pounds of both kinds of chicken, you can expect to see all manner of poultry delights coming up on No Free Lunch.

Monday, January 23, 2012

Macaroni Casserole

I would bet there are a few dishes that transport you back to your childhood every time you eat them. This is definitely one of mine. My grandparents have been making this casserole for as long as I can remember. It's an ancient and traditional recipe they smuggled to the United States all the way from Hong Kong. I also might have made that up. This is a delicious and easy-to-make macaroni casserole that truly deserves to be passed down through the generations. I would love to hear about dishes of your childhood in the comments!


Ingredients
  • 2 cups dry elbow macaroni
  • 1 pound ground beef or pork
  • 1 cup diced mushrooms
  • 1 can cream of mushroom soup
  • 1 cup grated or crumbled hard cheese
  • Olive oil
  • Salt and pepper
  • Garlic powder
  • Worcestershire sauce

Instructions

The choice of meat is up to you. I have made it with all pork, all beef, or a mix of the two. You can also add diced ham if you like. This recipe makes a pretty meaty casserole. If you prefer less meat and more pasta, adjust accordingly.

Boil salted water in a pot. Once the water is boiling, cook the macaroni for ten minutes. Then drain and rinse the pasta. Preheat oven to 350 degrees. Season the meat with salt, pepper, garlic powder, and Worcestershire sauce. Heat olive oil in a frying pan and brown the meat and mushrooms. Work in batches to avoid crowding the pan. 


Once the meat, mushrooms, and macaroni are finished, mix them all together in a casserole dish. Take about 2/3 of the soup out of the can and mix it in also. Smear the rest of the soup over the top of the pasta-meat mixture. Top with cheese. You can use whatever cheese you want. This time, I used gruyère. Cheddar or Monterey Jack are other good options.

Bake the casserole for 10 minutes, then broil for about 5 minutes, until cheese becomes crispy. Handle with care, as the dish will have become very hot. Scoop out onto plates, making sure everyone gets a proper cross-section. It keeps very well in the refrigerator. Just heat it up for a few minutes in the microwave later.

Sunday, January 22, 2012

Pub Week Retrospective

During Pub Week, No Free Lunch crossed 500, 600, and 700 pageviews! I would call this a big success. I want to thank you, the readers, for your continued support. Two readers even posted on their successful dinners after having made some of the dishes posted here.

Looking forward, No Free Lunch will resume its more relaxed pace of recipe posts. Tomorrow's is especially near and dear to my culinary heart. As always, suggestions for future recipes are always welcome.

Happy Chinese New to all of you... stay tuned for some Chinese favorites later this week.

Saturday, January 21, 2012

Bangers and Mash

Pub Week, Day 7! Pub week rolls to a close with perhaps the most quintessential pub grub of them all: Bangers and Mash. Most of the time, I tell people that most complicated-seeming dishes are actually pretty easy to make. This one, however, is the opposite. Bangers and Mash seems very simple, but it actually takes a fair amount of dedication to produce, since it has 3 separate elements that need to come together at once.


Ingredients

Mashed Potatoes
  • 2 gold potatoes
  • 1 1/2 tablespoons half and half
  • 1 tablespoon butter
  • Salt and pepper to taste
Sausage and Gravy
  • 2 links pork sausage
  • 1/2 onion
  • 1 1/2 tablespoons butter
  • 1 tablespoon flour
  • 1/2 cup beef stock
  • Worcestershire sauce
  • Salt and pepper to taste

Instructions

Mashed Potatoes

Boil water in a pot. Peel the potatoes and cut into halves. Boil the potatoes until soft (pokeable with a fork), 20-30 minutes. Once soft, drain the potatoes and mash with a potato masher. Add butter and half and half, and mix thoroughly. Season to taste.


Sausage and Gravy

Heat sauté pan to medium-high and brown sausages on both sides. Fill the pan up with water, about 1/3 up the sides of the sausages. Cover the pan and poach for 20 minutes. While the sausages cook, dice the onion.


Drain the water and set the sausages aside. Melt the butter in the pan and sauté onion pieces until soft, about 5 minutes. Add flour and stir together to integrate. Pour in the beef stock and a splash of Worcestershire. Mix together and reduce for a few minutes to thicken the sauce, and season to taste.


Once all three components are ready, place a mound of potatoes on the plate, top with sausages, and pour the gravy over the plate. Serve with a strong English pale ale for a full alehouse meal. I went with Samuel Smith's Old Brewery Pale Ale.

Friday, January 20, 2012

Roasted Potato Wedges

Pub Week, Day 6. With the whirlwind of blogging going on this week, I've decided to present my roasted potato wedges early. These have been a staple of my diet going back to undergrad. Easy, tasty, and they make the kitchen smell great. The first time I made roasted potatoes, it was in a toaster oven - you can really improvise when the conditions are right (or is it wrong?). These potatoes are a great accompaniment to any meal, be it steak, burgers, fish, or chicken. You can even make a delicious one-pan meal by roasting chicken  legs or sausages on the sheet pan with the potatoes.


Ingredients
  • 4 red or gold potatoes
  • 1/4 cup olive oil
  • 1/2 teaspoon salt
  • 1/4-1/2 teaspoon garlic powder
  • 1/4-1/2 teaspoon onion powder
  • Dried basil
  • Dried oregano
  • Black pepper

Instructions

Preheat oven to 400 degrees. Wash each potato and cut in half. From each half, cut into 3-4 wedges depending on size of potato. Leave the skins on. Place wedges in a gallon-size plastic bag. Pour olive oil into the bag, then add the seasonings right onto the potato. Amounts of each is at your discretion, but 1/4 to 1/2 teaspoon is about right for any of them. Use enough of the dried herbs so that you can see plenty of them on the wedges. You may also choose to add paprika or cayenne pepper to taste. Seal the bag and mix the ingredients around liberally to coat the potatoes evenly. Another great variation to try is to grate Parmigiano-Reggiano into the bag.


Lay out the wedges on a non-stick sheet pan. Bake for 15 minutes, then take the pan out and turn each wedge over to brown the outside evenly. Bake for about 10 more minutes. The potatoes will be soft on the inside and crispy on the outside. Let cool a bit and serve with sour cream.

Thursday, January 19, 2012

Beer-Battered Tilapia

Pub Week, Day 5. Fish and chips are an absolute pub classic, as well as popular street food in the UK. Here I have put a few twists on the traditional formula. I've swapped cod for tilapia, which is readily available in US grocery stores. I also chose to make roasted potato wedges instead of french fries (chips). The recipe for the potato wedges will be posted next week. The exact formula for the batter is still something of a work in progress - you may desire to add a bit more flour, or perhaps some spices. Ideas are welcome in the comments!


Ingredients
  • 2 tilapia fillets
  • 1 cup all-purpose flour
  • 1 cup Guinness stout
  • 1 egg
  • Salt and pepper
  • Malt vinegar
  • Oil for frying

Instructions

Pour flour and Guinness into a bowl. When pouring the beer, try to pour against the side to stop the creamy head from forming. Crack the egg into the batter, and lightly season with salt and pepper. Whisk together thoroughly.


If you look at the tilapia fillets, you will notice they have a natural divide down the center. Slice each fillet in half, so that they'll be more manageable to cook. Lightly salt, pepper, and flour each side, then dip in batter to coat. Drop each piece into the oil, taking care not to crowd the oil or let the fish pieces stick together. I did two pieces at a time in my small fryer. Cook for about 6 minutes.

Serve immediately to retain crunchy exterior. Pour malt vinegar over the fish and salt to taste before eating. This recipe, along with the potatoes, makes 2 servings. There is more than enough batter here to fry a lot more fish than just our two fillets, so keep that in mind if multiplying the recipe.

Wednesday, January 18, 2012

Chicken Curry

Pub Week, Day 4. The British left India in 1947, but they took curry with them, and the dish has left an unmistakable mark in the food of the British Isles. In return, the Indians got cricket, which they enjoy with equal zeal.


There are countless options when making curry; use whatever meat or vegetables you like. I have made curry with beef sirloin, pork loin, or even ground meats. Mushrooms and potatoes (boil them ahead of time) are also good options. This time, we're mixing it up with chicken breast. Curry is a good use for chicken breast, since the dish already has lots of bold flavors to complement the chicken. Using sour cream as the base for the sauce, this recipe will give you a relatively thick curry.


Ingredients
  • 1 split chicken breast
  • 3 carrots
  • 1/2 onion
  • 1/2 cup frozen peas
  • 1/2 cup sour cream
  • 1/4 cup half and half
  • 2 teaspoons curry powder
  • Wondra
  • Cayenne pepper
  • Salt and pepper
  • Vegetable oil

Instructions

Peel and dice the carrots and dice the onions. Heat oil in a sauté pan, medium heat. Add one teaspoon of curry powder to the oil. Sauté the carrots and onions for a few minutes, stirring frequently.


While vegetables are cooking, cut the chicken meat off the bone and into chunks about one inch a side. You may choose to keep the skin for extra flavor. Season with salt and pepper. Put the chicken pieces into the pan with the vegetables, and add more oil if needed. Add the rest of the curry powder and mix well. Cover the pan and cook the whole mixture until the chicken pieces are cooked through. Turn the chicken occasionally so it cooks evenly.


Add the sour cream, half and half, and peas to the pan, and stir to integrate. There is no need to defrost the peas beforehand. Give the sauce a taste; add salt and cayenne pepper to taste. If desired, thicken the sauce by sprinkling in some Wondra. Now turn up the heat a bit, and reduce the sauce for a few minutes. At the end, it will really stick to the chicken and vegetables. Serve over white rice.

Tuesday, January 17, 2012

Scotch Eggs

Pub Week, Day 3! I've been a fan of scotch eggs for a long time, but I had never made them before. I first ate them at the Minnesota Scottish Fair, state fair style - on a stick. As luck would have it, my wonderful girlfriend gave me an electric deep fryer, so today was a perfect opportunity. As it turns out, scotch eggs are actually pretty easy to make, with very common ingredients. This recipe makes two scotch eggs.


Ingredients
  • 3 large eggs (2 for boiling, 1 for egg wash)
  • 1 link raw pork sausage, or equivalent bulk sausage
  • Flour
  • Bread crumbs
  • Salt and pepper
  • Oil for frying

Instructions

Start by hard boiling the eggs. Fill a pot with cold water, submerge eggs, and bring to a boil. Once the water starts boiling, remove from heat and let stand for 10 minutes. Remove the eggs and set aside to cool. This can be done well in advance.

A note on sausage: I always buy link sausage, for two reasons. First, as a person living alone, it is very easy to freeze the individual links for later. Second, you can always de-case the links. I used Italian sausage here, but use whatever kind you have.


If using links, de-case the sausage. Conveniently, a regular sized link will be perfect for two scotch eggs. Divide the sausage in half and form into thin patties. Flour both sides of the patty and lay a peeled egg on it. Wrap the sausage up and around like a blanket, working it with your fingers until it thins and covers the whole egg. Make sure it's secure and there is no egg showing. This is actually a lot easier than I was expecting - the sausage stays on very nicely.


Preheat oil in a pot or deep fryer. You want the oil to be hot enough to get the breading nice and crunchy, but not too hot so that it will burn. Crack the remaining egg into a bowl and beat with a fork. Pour breadcrumbs into a shallow bowl or plate, and season with salt and pepper. Roll each sausage-egg in the egg wash, then in the breadcrumbs, and carefully drop into the oil. You can fry two eggs at a time. Cook in the oil for about 4 minutes, then let them rest on a paper towel for a few minutes. Carefully cut the eggs in half with a serrated knife.

You can enjoy your scotch eggs hot or cold. They are great on their own or with a dipping sauce. I whipped up a quick spicy mayo using regular mayonnaise, smoked paprika, a little garlic powder, and a few squirts each of Sriracha and Worcestershire. You can also use a straight hot sauce or anything you like.

Monday, January 16, 2012

Pimm's and Lemonade

Pub Week, Day 2: Pimm's is a refreshing English cocktail perfect for cooling off on a hot summer day supporting your favorite team at the County Championship. So what are we doing in the middle of January? I drink Pimm's all year round as I pine for warmer days. You can use whatever fruits you like, but this is my go-to recipe. Also traditional is a sprig of mint. Readers from this side of the pond will notice that in the UK, "lemonade" refers to lemon-lime soda.


Ingredients
  • 1 part Pimm's No. 1 Cup
  • 3 parts lemon-lime soda (Sierra Mist is my preferred)
  • 1 slice lemon
  • 1 slice orange, halved
  • 1 slice cucumber
  • 1 strawberry
  • ice cubes


Instructions

Cut off the top from the strawberry and slice the other fruits. Put ice cubes into a tall glass. Pour in Pimm's and lemon-lime soda. If you are really into measuring, 1 shot glass of Pimm's and 3 of soda works well. Stir well, add fruit, and enjoy!

Sunday, January 15, 2012

Guinness Stew

To kick off Pub Week, we have a hearty Guinness stew. I did a bit of research beforehand and came up with a sort of amalgam of the recipes floating around on the internet. This one is pretty simple to make. It's also delicious - I just ate it.


Ingredients
  • 2 pounds stew beef
  • 3 potatoes (red or gold)
  • 4 carrots
  • 1 sweet onion
  • 1 can diced tomatoes
  • 1 bottle Guinness (or other stout)
  • 4 cups beef broth
  • 2 tablespoons butter
  • 2 tablespoons flour
  • Olive oil
  • Salt, pepper, and garlic powder
  • Parsley

Instructions

If you don't have beef broth, you can do what I did and heat 4 cups of water in a saucepan and dissolve one bouillon cube in it. Purists may scoff, but I don't care. One cube is enough; we don't want the broth to be too salty.

Have two large bowls ready to set aside ingredients. Season the beef with salt, pepper, and garlic powder. Preheat olive oil in a large pot, high. Brown the meat for a few minutes, one pound at a time. Remove and set aside. When I did this, the beef gave off a lot of liquid. Set this aside with the meat also. 


While the beef is cooking, peel and chop the carrots into disks. Saute the carrots in olive oil for a few minutes, then set aside. While the carrots are cooking, wash and cut up the potatoes into about 10-15 pieces, depending on the size. Add more olive oil and saute these for a few minutes as well. Set aside with the carrots. While potatoes cook, roughly chop the onion into strips. Turn down the heat to medium, add more oil, and brown the onions. 

Once the onions are soft, pour the Guinness and beef broth into the pot. Add beef and tomatoes, along with the juice in the can. Cover and simmer for one hour. Now add the potatoes and carrots back in and cook uncovered for another hour. By now, the meat and vegetables will be very tender.

The star of our show.

If you, like me, desire a thicker broth for your stew, prepare a roux. Melt the butter in a saucepan on medium-low heat. Once the butter is melted, add the flour and stir together. Keep stirring as it cooks to avoid clumping and burning. The roux will bubble and slowly darken. Remove from heat after a few minutes, when the roux attains the color shown below.


Spoon a little of the broth from the stew into the roux and scrape it all into the main pot. Stir to integrate. Now, taste the broth. Season with salt and pepper to taste. Below you'll see what the stew looks like at the end. Serve in bowls and sprinkle parsley over the top of each. I suggest serving with a bread roll to sop up the stew.


Store the remaining stew in the fridge, and you will eat for days!

Announcing Pub Week!

As the first week of posts on No Free Lunch draws to a close, I am proud to announce that next week is Pub Week! After all, what blog is complete without theme weeks? Even Chad Speaks did it.

I will be featuring my versions of popular pub foods. The first of these is on the stove right now.

Friday, January 13, 2012

Grandma's Tangyuan (奶奶湯圓)

Dumplings: So many varieties, all delicious. The first of many dumpling recipes here on No Free Lunch, is my Grandma's (relatively) famous tangyuan - glutinous rice flour dumplings. These easy-to-make dumplings combine the traditional Chinese tangyuan - which translates to "soup rounds" - with an American favorite- peanut butter. The peanut butter adds a crunchy texture to the otherwise soft dumplings.


Ingredients
  • 1 pound glutinous rice flour
  • 2 cups water
  • 1/2 cup chunky peanut butter
  • 2 tsp sugar

Instructions

To make the dough, combine the flour and water in a large mixing bowl. Use your fingers to work the mixture into a dough. You'll notice that it is firmer than regular bread dough. In a separate bowl, mix the peanut butter and sugar thoroughly. 


To form the dumplings, break off some of the dough and form it into a small disk in your hands. To get an idea of the size, first make a ball at most 1 inch in diameter, then flatten. When sizing the dumplings, keep in mind that they absorb a lot of water when cooking, and expand. Spoon a small amount of the sweetened peanut butter onto the disk and fold up the edges. Rub the dumpling in your palms until it takes a ball shape.


Place the dumplings on a flat surface, making sure none of them are touching. A non-stick sheet pan is perfect for this. If you are not going to eat the whole batch right away, put the pan in the freezer until the dumplings are no longer sticky. You can then transfer them to a plastic bag and save them for you next majiang night.

To cook the dumplings, bring water to a boil in a saucepan and drop the dumplings in. Cook until the dumplings float. Serve with hot water, soup-style. My batch came out to 31 dumplings, but you will get more if you make them smaller.

Wednesday, January 11, 2012

Pan-Fried Steak

After a long day at the office, there are few things better than unwinding with a delicious steak. This meal is all about showcasing the star ingredient - the beef. The best part? You can have a steakhouse-quality meal at home for a fraction of the price. And you can easily do it in just 30 minutes. Let's get started.


Ingredients
  • 1 strip steak
  • 1/4 small sweet onion
  • 1/2 cup red wine
  • 1/2 cup water
  • 1/3 bouillon cube (approximate)
  • Olive oil
  • Salt and pepper to taste
  • Dry oregano to taste

Instructions

First, we have to start with the right pan. Ideally, you want a flat-bottomed pan that will stick a little. That means stay away from Teflon. I used a copper saute pan. Start by pouring in some olive oil, enough to cover the bottom of the pan. Turn the heat up to almost as high as it goes. We want to char the outside of the meat, but we don't want the oil to pop too much.

While we're waiting for the pan to heat up, we'll prepare the other ingredients. If you have a favorite dry rub for your steak, feel free to use that. However, I think simplicity is best here. Lightly salt and pepper each side of the steak. Chop the onion into small pieces.

Next, place the steak in the pan. It should be sizzling as soon as it hits the oil. Let it cook for 4 minutes on each side, turning it with tongs. You'll notice the meat sticks to the pan and leaves a residue when you flip it. We'll want this for later. 4 minutes a side will leave the beautiful pink color and juiciness inside the steak. If your piece is particularly thin or thick, alter the cooking time accordingly. The hot pan will leave a nice char on the outside.


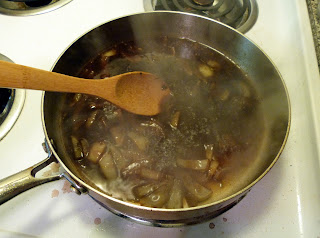
Once the steak is done, remove it from the pan and turn the heat to medium. We will now make the sauce. Drop the onion pieces into the pan and cook for a few minutes, stirring frequently to avoid burning. Once the onions have softened and developed a little color, pour in the wine and water. Drop in the bouillon and crush it with a spoon. I only use 1/3 of the bouillon cube to prevent the sauce from getting too salty. Season to taste with oregano. You can use your spoon to scrape the meat residue stuck in the pan to integrate them into the sauce. You can see this in the photo above.


Now, turn the heat up and reduce the sauce. Keep tasting the sauce as you go along, and you will notice that the raw wine taste will give way to a deep, rich, meaty flavor. After a few minutes, you are ready to serve. Spoon the onions and the sauce over the steak.


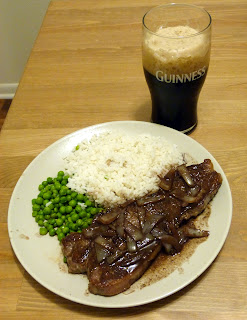
Pictured here are white rice and peas as accompaniments. The rice is delicious with the extra pan sauce and onions poured over it. You'll want a robust drink to go with this meal; I chose Guinness Foreign Extra Stout, my favorite of the Guinness varieties.

Monday, January 9, 2012

Pork Fried Rice

For my first recipe, here's an old favorite. This is a very adaptable, basic fried rice that you can really add whatever you like to. Fried rice is a great way to use your leftover rice. It's usually said that day-old rice is the best for frying. You'll notice the amounts of each ingredient are somewhat vague - with fried rice, exact proportions are not important. It's all up to your preference.


Ingredients
  • 2-3 pieces sliced pork loin
  • 3 large eggs
  • 1 bunch green onions (about 8)
  • 3-4 cups cooked rice
  • Vegetable oil
  • Worcestershire sauce
  • Soy sauce
  • Salt and pepper to taste

Instructions

First, we'll prepare all our ingredients. Chop the green onions into small pieces and set aside. Cut up to the point where they start getting white and firm. Next, cut the pork into cubes, and dust with salt and pepper. You can use other seasonings here, too, whatever you like. I added a bit of garlic powder. Crack the eggs into a bowl and beat with a fork. You can add a little salt and pepper to the egg now if you prefer.

I use a steel wok for cooking fried rice, but if you don't have one, a large regular frying pan will do. However, you have to be careful since they are shallower. Heat your wok to medium-high and cook the scrambled eggs until they solidify, but don't overcook them. They should still be pretty soft when you take them out. Set aside.

Turn up the heat and add a small amount of vegetable oil to the wok and drop in the pork cubes. Turn them every so often to get cook evenly. Add a few drops of soy sauce if you like. Once the pork is brown on all sides, add the chopped green onions and a bit more oil. 

Now it's time to add the rice. If it's been sitting in the refrigerator, it's most likely clumped up. Don't be shy with this. Dig in and break it up with your fingers as you transfer it into the wok. The more you can break it up, the better. At this stage, I add a few splashes of soy sauce and some generous splashes of Worcestershire sauce. The Worcestershire is the Wai family secret ingredient. Don't tell anyone you know about it. I also give it a few squirts of Sriracha chili sauce for a little heat. Mix the rice each time you add something in. Once you've done all this, add the egg back in, break it up a little, and mix in.


We want the whole thing to cook a little, and get brown on the bottom. This means you need to let it sit on the heat for a while and resist the temptation to flip the rice. Don't let it burn, though. After a few minutes, you're done! This recipe will feed two people.

Serve and enjoy. I've been eating this stuff my whole life, and I like to have a glass of milk with my bowl of fried rice, but your favorite lager would be fine, too.

Welcome!

I'll be using this blog to post my recipes and other discussions about food. I'll talk about my favorite ingredients and maybe even places to eat around Lafayette.

The title of this blog refers to the idea that, economically, nothing is without cost. However, I believe anyone can cook delicious meals without spending a lot of money or time. And maybe you'll have some fun along the way.

I rarely go to the grocery store to shop for a specific meal. Instead, I get my favorite ingredients which I can use in a variety of ways later. My approach to cooking is to be adaptable - use what you have in the kitchen and be creative. All recipes can be toyed with if you don't have everything on the list. That's why many of my favorite meals to cook are ones that have infinite possibilities - fried rice, frittata, tacos, and more.

Recipes posted here will usually be whatever I'm cooking, but I'll also post requests, so feel free to leave suggestions!