Friday, July 24, 2015

Indy's Pittsburgh Cassoulet

I got this recipe from my friend, Harrison "Indy" Turner, who came to visit nearly three years ago. Right before leaving, he handed me a tiny piece of paper with the recipe on it. I stuffed the paper into my coat pocket, where it sat until last March, when I suddenly remembered its existence and rediscovered it. In true Indy style, the recipe is deliciously vague, with such gems as "<1 pound of hot dogs" and "large can o' baked beans." As such, I've done some interpretation, as well as elevating the technique (slightly) beyond "mix ingredients in dish; bake 40-45 min at 350° F."


I do not know whether the recipe is an old family secret or Indy's own concoction; both seem rather plausible. In any case, the use of chopped hot dogs certainly appeals to my Midwestern sensibilities. We regularly added them to boxed mac and cheese or ramen for a quick meal when I was a kid. The basic formula of a bean and sausage casserole is also quite close to my heart as a big fan of cassoulet. It is this resemblance that led me to dub this dish "Pittsburgh Cassoulet." The original recipe did not specify what type of mustard. Since hot dogs are featured, I went with yellow mustard. Going along with the theme, both the ketchup and mustard were Heinz.

The original recipe

Ingredients

  • 6 hot dogs, sliced into discs
  • 1 onion, diced
  • 1 lb canned baked beans (2 standard sized cans)
  • 10 oz canned pineapple chunks, drained (1/2 standard can)
  • 1 Tbs brown sugar
  • 1 Tbs ketchup
  • 2 tsp yellow mustard (or more to taste)
  • Olive oil
  • Black pepper

Instructions

Preheat oven to 350° F. In a dutch oven or heavy saute pan, cook the hot dogs and onion with a splash of olive oil until hot dogs are lightly browned and onions are softened. 


Add the beans, pineapple, brown sugar, ketchup, and mustard. Mix well and transfer to the oven. 


Bake for 45 minutes. Add black pepper to taste.

Tuesday, July 14, 2015

Flammekueche (Tarte Flambée)

Bonne fête and welcome to the 2015 edition of the No Free Lunch Bastille Day special, which I think is fair to say has become a tradition here. This time, we head to Alsace for flammekueche, known in French as "tarte flambée." It translates roughly as "flame cake," but can be thought of as a thin crust pizza. Although flammekueche is not part of the "core" library of French cuisine, it is an Alsatian classic. In a way, Alsatians were the first to celebrate Bastille Day, storming the Strasbourg city hall just a week after the Bastille fell. Today, we salute their revolutionary spirit.


Alsace is one of the world's fascinating border regions, being passed from the Austrian-led Holy Roman Empire to Burgundy, to France over the years. Seized by Otto von Bismarck in the Franco-Prussian War, Alsace became a part of the German Empire until returning to France, where it has remained, in the Treaty of Versailles. Traditional Alsatian cuisine is a testament to the cultural blending that came out of this history. Where else in France is sauerkraut a central part of the cuisine? Their coq au vin is even made with Riesling. In fact, the first time I had flammekueche was in Germany.

As with many traditional dishes, my investigations turned up a lot of variation. The biggest differences are in the dough. Some use yeast and rise the dough, while others do not. Since the Wikipedia article describes it as "bread dough" I went the yeast route. There are also a variety of takes on the topping. I had decided on a mix of crème fraîche and fromage blanc, a tart fresh cheese from France. I was unable to get fromage blanc, so I am substituting fat free Greek yogurt. I also had some of the crema Mexicana left from the corn, and used that in place of crème fraîche.

Ingredients

Dough
  • 2 1/2 cups all-purpose flour
  • 2 1/4 tsp (1 package) dry active yeast
  • 1 tsp salt
  • 1 cup warm water (105-115 degrees F)
Topping
  • 3/4 cup crème fraîche (substitute crema Mexicana)
  • 3/4 cup fromage blanc (substitute fat free Greek yogurt)
  • 1 onion
  • 6 strips thick-cut bacon
  • Salt and pepper to taste

Instructions

Dough

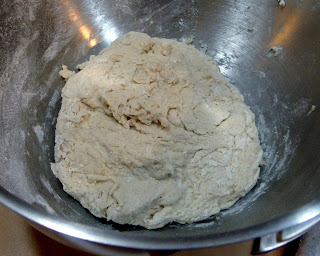
Start by preparing the dough about 2 hours ahead of time. Mix the flour, salt, and yeast in a large bowl. Make a well in the center and pour the water in. Slowly mix the flour into the water until everything is integrated. 

Before kneading
Knead until smooth. I did this in the stand mixer. Note the dough is quite sticky compared to bread dough. 

After kneading

Transfer the dough to a large, lightly oiled bowl. Cover with plastic wrap and let rise for 1 hour. Punch down, cover again and let rise for 1 more hour. Punch down again and divide the dough in half.

Assembly

Preheat the oven to 500 degrees F. Halve the onion and cut it crosswise as thin as possible. Cut the bacon into thin strips, about 1/4 inch wide. Mix together the crème fraîche and the fromage blanc/yogurt. 

Ready to bake

Roll both pieces of dough into large, thin rectangles. Transfer to oiled sheet pans. Spread the topping mixture over both, and sprinkle onion and bacon on top. Salt and pepper to taste. Bake on lower rack for 15 minutes. Cut into squares for serving. Wine pairing would traditionally be Riesling, but Vouvray did nicely today.

Saturday, July 11, 2015

Mexican Street Corn (Elotes)

Although I've wanted to make these for a long time, this recipe was inspired by eating a delicious cup of Mexican street corn from a food truck in Michigan City last weekend. The timing was good, as the local farmers selling sweet corn in the Pizza Hut parking lot have just set up shop. Now that I've tried it, I'm convinced this is a fantastic way to eat corn. As the name suggests, elotes are a street food in Mexico. Of course, they are also quite a mess to eat, so the version in a cup, known as esquites, are also an option. You could simply follow this recipe, but cut the kernels off and mix in the coating ingredients. Either way, making street corn is very easy and a great way to shake up your corn-eating experience.


I bought two new ingredients for this recipe. Crema Mexicana, or Mexican cream, is a cultured cream mostly interchangeable with the French crème fraîche. Compared with sour cream, the flavor is milder and the texture is looser.


Cotija is a hard, crumbly Mexican cheese made from cow's milk. The cheese is salty, and squeaks a little when biting in, kind of like cheese curds. It can be crumbled by hand. If unavailable, substitute another hard, crumbly cheese. A lot of recipes use parmesan. If doing this, I would definitely try to get a good, strong Parmigiano-Reggiano from Italy. I found both of these ingredients in the regular supermarket. The crema was located with some other Mexican products, such as tortillas and queso fresco, while the Cotija was in the cheese section.

Ingredients
  • 4 ears corn
  • 1/4 cup crema Mexicana or crème fraîche
  • 1/4 cup light mayonnaise
  • Chili powder to taste
  • 1/2 cup crumbled cotija or parmesan
  • 1 lime, quartered into wedges

Instructions

Remove husks and hair from the corn, but leave the stem attached. This will act as a handle once the corn has been dressed. Preheat the grill and brush oil on the grate. Grill the corn on a relatively high flame with the cover down. Turn occasionally until all sides are browned. 


While the corn is cooking, mix the crema and mayo together. Once the corn is done, spread the mixture all over the corn. Dust with chili powder, then sprinkle the cheese all over. You may want to press the cheese in so that it sticks to the cream. Finally, squeeze the lime on the corn.

Thursday, July 9, 2015

Steamed Beef with Spicy Rice Powder (粉蒸牛肉)

Fenzheng niurou, translated as "powder steamed beef" (one of the more intuitive translations we've seen so far), hails from the western province of Sichuan. I am still quite a novice when it comes to the various regional cuisines of China, but I'm pleased to say traveling the provinces with Peimei has certainly broadened my knowledge. After dad spotted boxes of spicy rice powder (discussed below) in the Chinese store, I had to give this one a go. He seemed very familiar with the dish, but I don't recall ever eating it before, so we're off into terra incognita with this one. I was immensely pleased with the results. As one of the pictures later shows, the beef goes in fairly dry and emerges as a deep, rich stew, I think in large part due to fat and connective tissue breaking down. I was amazed by how tender the beef was and how well the flavors developed and blended in just 30 minutes of cooking time. 


The unusual ingredient here is the spicy rice powder. This is really a misnomer, as I really wouldn't describe it as a powder, but more like broken up rice. I used prepackaged rice powder. Preparing the powder involves toasting rice with star anise and Sichuan peppercorns, then crushing the rice up. This then becomes a quasi-breading for the beef. Note that the above photo was made with only 1.75 oz of rice powder (one box), but I would double that, as the recipe suggests.


Hot bean paste and Sichuan peppercorn, the staple Sichuan ingredients make their return here, after their first appearance in mapo doufu. These two combine give western Chinese dishes their distinctive heat and aroma. Unlike most of her recipes, Peimei is completely vague on the cut, asking only for "beef" (I did check the Chinese recipe, and it is equally vague). I went with chuck for its good flavor and utility in stews and braises, and this worked out very well. Interestingly, I bought the meat as "western ribs" or "country ribs" -- mostly boneless shoulder cuts of meat sliced into strips, so it was quick to break these down into the slices I needed. Pork country ribs are, by the way, my favorite cut to make char siu.

Ingredients
  • 1 1/2 lb beef chuck
  • 3.5 oz (100 g) spicy rice powder
  • 2 green onions
  • Sichuan peppercorn powder to taste (optional)
Marinade
  • 1 1/2 Tbs minced ginger
  • 1 tsp five spice powder
  • 2 Tbs hot bean paste (doubanjiang -- see Exotic Ingredients)
  • 4 Tbs soy sauce
  • 2 Tbs Shaoxing wine or dry amontillado
  • 2 tsp sugar
  • 1 tsp salt
  • 1/3 c vegetable oil

Instructions

Cut beef across the grain into thin slices, 1 to 1 1/2 inches across. Combine the beef and all marinade ingredients in an airtight bag and let stand in the refrigerator for 30 minutes.


Spread out the rice powder on a plate and dredge each slice of beef on both sides. 


Steam the beef for 30 minutes. If you have small, shallow bowls that can fit inside a bamboo steamer, then use those. I did not have bowls that fit, so I put the beef in a 10 x 10 inch cake dish and set this inside a wok with boiling water below, then covered with a lid. Whatever your strategy, you need the steam to be trapped over the beef. 


Once the beef is done cooking, add the remaining green onions and dust with peppercorn powder, if desired. Mix together and serve. I served with rice and Chinese vegetables.

Commentary

I made minimal changes to the original recipe. The main thing was that I swapped out star anise for the more readily available five spice powder in the marinade. Other than that, I played with the marinade proportions a little. Peimei also calls for an entire cup of rice powder per 3/4 lb. beef, which seems absurd to me.

As a final note, it's worth mentioning that the way my version turned into a deep and delicious stew does not seem to be universal. The photo in the cookbook looks a lot dryer, as well as others I saw on the internet. 

Saturday, July 4, 2015

Chicken Kebabs

Cooking a great meal can be the source of much pride and satisfaction. Sometimes, that satisfaction comes from doing lots of research, gathering ingredients, and pulling off a long, complex recipe. Something like Shanghai-style dumplings comes to mind. Other times, though, coming up with a simple dish on your own and having it exceed expectation can be just as satisfying. With just some chicken thighs on hand, I started looking at some Turkish kebab recipes and came up with this. The result was incredibly delicious. The chicken gets a good char, but is nice and juicy on the inside. They are just a little spicy, but not overwhelming at all.


I found out after the fact that yogurt-marinated chicken kebabs are called şiş tavuk in Turkish. I believe this is pronounced something like "sheesh tah-vook." It occurs to me that Turkish cuisine is one that hasn't quite caught on the US in the way that a lot of others have. If only we had a döner stand on every corner like the Germans do. On a side note, I still remember the first jet lagged kebab we had after touching down in Munich so many years ago, so it must have been pretty good!

A quick note on equipment: The use of metal skewers, from what I've heard, is preferred for chicken because the skewers conduct heat to the center of the meat, whereas for beef, wooden skewers are preferred. Besides, I love an opportunity to use my fun Turkish-styled skewers that invoke images of the Janissaries marching around the Ottoman Empire. Or maybe that's just me. 

Ingredients

  • 4 lb boneless chicken thighs
  • 2 cups plain Greek yogurt (I used fat free)
  • 1 Tbs cumin powder
  • 1 Tbs paprika
  • 3 Tbs lemon juice
  • 1 tsp crushed red pepper
  • 2 tsp salt
  • 1 tsp black pepper
  • 1/2 onion, minced
  • 4 cloves garlic, minced

Instructions

Trim off any skin or large areas of fat from the chicken. Cut into small pieces, about 1 1/2 inches across. In a large bowl, combine chicken with all other ingredients. Mix well with hands to coat the chicken. Cover with plastic wrap and let marinate in the refrigerator for 1-2 hours.


Preheat grill to about 400° F. Assemble the kebabs on skewers. I used 5 skewers. Place the kebabs on the lower rack, right above the flame. Cook with the cover closed until lightly charred on all sides, turning occasionally. If the chicken starts to get done before the char develops, turn the heat up and cook uncovered.

I served with rice. The chicken was also excellent on sandwiches the next day.

Wednesday, July 1, 2015

Shredded Pork with Steamed Buns (京醬肉絲)

Today's post is inspired by two recipes I found in Peimei's Chinese Cookbook. The first recipe, the shredded pork, is transliterated jingjiang rousi. This is a classic northern Chinese dish, and as such was sort of outside my normal milieu when it comes to Chinese cooking. Peimei serves it with dan bing, the same super-thin pancakes which often wrap Peking duck. As these are quite labor intensive, I decided to save them for another day and make the much simpler sandwich-style buns in the picture. I have been dabbling with various bun recipes for a few years now, but have been waiting to perfect them before posting. These buns, by contrast, are stunningly simple, containing no yeast and requiring no raising. Peimei's recipe, called "Flower Shaped Buns," has a few extra steps to make them prettier, which I omitted.


The name translates literally to "capital city paste meat strings," but as with many Chinese expressions, brevity rules over ease of translation, and implied meaning is left out. A more accurate translation might be "shredded meat with bean paste from Beijing." Peimei goes with "Shredded Pork with Bean Sauce." I made relatively few departures from the original recipe, other than roughly doubling it. For the buns, we used butter instead of lard, and they came out just fine.


Today's recipe features a new "exotic ingredient" -- sweetened soybean paste. Just when I think I have used just about every possible fermented bean product, another one always manages to pop up. This stuff is quite thick, and has a smooth consistency and that deep umami that only fermented beans can provide. It's definitely milder than the funky fermented black beans or fermented tofu I have used in the past. Despite the name, I did not find the paste to be all that sweet, as the whole fermented bean thing tends to take over. I found it at the Asian grocery store.

Ingredients

Pork
  • 3 1-inch thick slices pork loin (about 20 oz)
  • 2 Tbs soy sauce
  • 2 Tbs cornstarch
  • 3 Tbs cold water
  • Vegetable oil for frying
  • 4 large green onions
Sauce
  • 3 Tbs sweetened soybean paste
  • 1 Tbs sugar
  • 1 1/2 Tbs water
  • 3 Tbs vegetable oil
Buns
  • 1 1/2 cup all-purpose flour
  • 2 tsp baking powder
  • 1 Tbs melted butter (substituting for lard)
  • 1 Tbs sugar
  • Sesame oil

Instructions

Shredded Pork

Cut the pork into long, thin strings. I cut each piece of pork loin into thin strips, then halved these lengthwise, as shown in the picture. In retrospect, I think going thinner is better, perhaps into 3 or 4 pieces instead. In a bowl, mix the pork with the soy sauce, cornstarch, and water. Let this marinate in the refrigerator for about 45 minutes. Cut the green onions into pieces about 2 inches long, then slice them up lengthwise into 2-4 smaller pieces. Set these aside. If you are making the buns, you can make them while the pork marinates. The recipe for the buns is set aside at the end of this post.


Heat up plenty of oil in a wok on high heat. Stir fry the pork until browned and cooked through. Set aside and clean out the wok. I found the marinade really burned onto the wok, and had to deglaze with water and scrape before moving on.


Heat up the 3 Tbs oil for the sauce, again on high. Combine soybean paste, sugar, and water in a dish and stir well. Add this mixture to the hot oil and cook for about 30 seconds. Add the pork and stir to coat. Serve with the green onion and buns and eat as small sandwiches.

Buns

Combine the flour, baking powder, butter, and sugar in a large bowl. Use your hands to mix together, then knead into a smooth dough. Cut the dough into about 20 equal pieces (for larger buns, you can do fewer). 


Flatten each piece of dough into rounds by hand, with the cut sides aligned as the top and bottom. These should be around 3 inches in diameter. Brush one half of each round with sesame oil, and fold them over into half-circles. This method is quite rustic, and they will not all end up exactly the same, but that's fine.


Place the buns in a bamboo steamer and steam for 8 minutes. As usual, we used steamer liners, but you can also put parchment paper under each bun.