Sunday, January 25, 2015

My First Cake

In commemoration of the most important holiday in this house, I achieved a personal first: making a cake. No Free Lunch is also a celebrating its first display of my amazing art skills. Last year, I told Ariel I would make a cake for her birthday. Looking back at my old posts, it becomes obvious dessert is not my strong point. Baking, especially cakes, intimidates me, as it is difficult to experiment and fix mistakes. Sadly, last year's cake never materialized, largely for these reasons. This time, I resolved to bake a cake, and with Ariel's expert help, produced this masterpiece.


The recipes I used for the cake and frosting are both from Mark Bittman's How to Cook Everything. Ariel said today that I treat this book as "a bible." I guess that makes me a fundamentalist Bittmanist. There are worse things to be called. The cake is Bittman's Golden Layer Cake, but made as a sheet cake in a 9x13. Because of this, the cake ended up a little thin, so next time I would make extra batter. The frosting is his chocolate buttercream. Both components were excellent. When tasked to decorate the cake, I turned to my artistic specialty: square-rigged ships. I am particularly proud of the American flag on the stern and the mermaid in the water. The cake is delicious, and definitely superior to the average "box cake." I also got a lot of experience using the rather intimidating stand mixer. 

We also spent the day making dim sum. On the menu today were potstickers, char siu bao (steamed pork buns), and nai huang bao (custard buns). As I perfect both kinds of buns, you can definitely expect them to show up on the blog eventually. Today's results were the best we've made so far, thanks to receiving the Yank Sing dim sum book from grandpa.

Thursday, January 22, 2015

Winter Grilling: Coho Salmon

For grill lovers like myself, the colder months can get a bit depressing. It's hard to get motivated to go outside, dig out the grill, and then stand outside when the temperature drops to zero as it did the last few weeks. That's not to say I've never shoveled snow off the grill -- sometimes you just have to have your ribs! When the weather improved these last few days, I jumped at the opportunity, as I encourage anyone to do.


This is more of a mini-post, rather than a full recipe, since this meal was so simple, but sometimes simple is best. Grilling fish sometimes makes me nervous, as I've had some bad experiences with sticking and falling apart. You do want to use the right fish, as well as make sure to use oil. Salmon does hold up quite well, and the full skin-on fillet of coho turned out very well. Here's what I did:

Preheat the grill. I let the grill get up to about 350 degrees before putting the fish on. Season both sides with salt and pepper, to taste. Rub olive oil on both sides. I also put a little cooking spray on the grill, but I'm not sure if this actually did anything.

Place the fillet on the grill, skin side down, and cook until the skin gets crispy, a few minutes. Flip the whole thing over and cook a few more minutes, just enough to get some nice grill marks. I kept the grill closed for most of it, and the salmon was not overcooked. Serve with lemon wedges.

Sunday, January 18, 2015

Baked Buffalo Wings

Buffalo wings are another dish I have been tweaking for a long time, and I think it's finally time for a post. According to Calvin Trillin's "An Attempt to Compile a Short History of the Buffalo Chicken Wing," the buffalo wing was invented in 1964 by Teresa Bellissimo of Buffalo's Anchor Bar. The story goes that the bar accidentally ordered a large amount of wings, and Mrs. Bellissimo devised the appetizer as a way to use them up. The wings soon made their way onto the Anchor Bar's menu. In the last few decades, wings have exploded in popularity and in some cases have become something of a premium item -- quite the elevation for a rather lowly cut.


Originally, Buffalo wings are deep fried. While this method will result in nicely crispy skin, it is a bit of a mess, so I bake them here. To get the crunchiness we want, the wings are coated in flour and the oven set very hot. The sauce is adjusted from this one, with the biggest change being cutting the butter down. The sauce holds up to this change, although I don't think I would cut it much further.

Ingredients

Wings
  • 2 1/2 lb chicken wings, skin-on
  • 2 Tbs vegetable oil
  • Salt and black pepper
  • 1/2 cup all-purpose flour

Sauce
  • 2/3 cup Frank's RedHot sauce
  • 5 Tbs butter
  • 1 1/2 Tbs white vinegar
  • 1/4 tsp garlic powder
  • 1/4 tsp Worcestershire sauce
  • 1/4 tsp cayenne pepper powder (optional)
  • Dash of salt

Instructions

Cut the wings into 3 segments: the "drumstick," the "flat," and the "tip." A good way to do this is to lay the wing skin side down on a cutting board, feel for the soft cartilage at the joints, and press into it with a chef's knife. If there is a lot of resistance, you're biting into the bone and should adjust knife placement. The tips usually don't have much meat on them, but I throw them in anyway.


Preheat the oven to 450 degrees. In a large bowl, combine wings and oil. Sprinkle a little salt and pepper, and mix to coat the pieces. Add flour and toss until wings are coated. Spread the wings out on a baking sheet. I use a silicone mat to prevent sticking. Bake the wings for 25 minutes. Flip the wings over about halfway through. The wings should be crunchy and golden brown.


While the wings bake, prepare the sauce. Combine all ingredients in a saucepan over medium-high heat. Stir until butter is melted and the sauce is homogeneous. Note that you can easily adjust the heat level by adjusting the amount of cayenne pepper.

Combine wings and sauce in a large bowl and toss until coated. Serve with blue cheese dressing and celery.

Friday, January 16, 2015

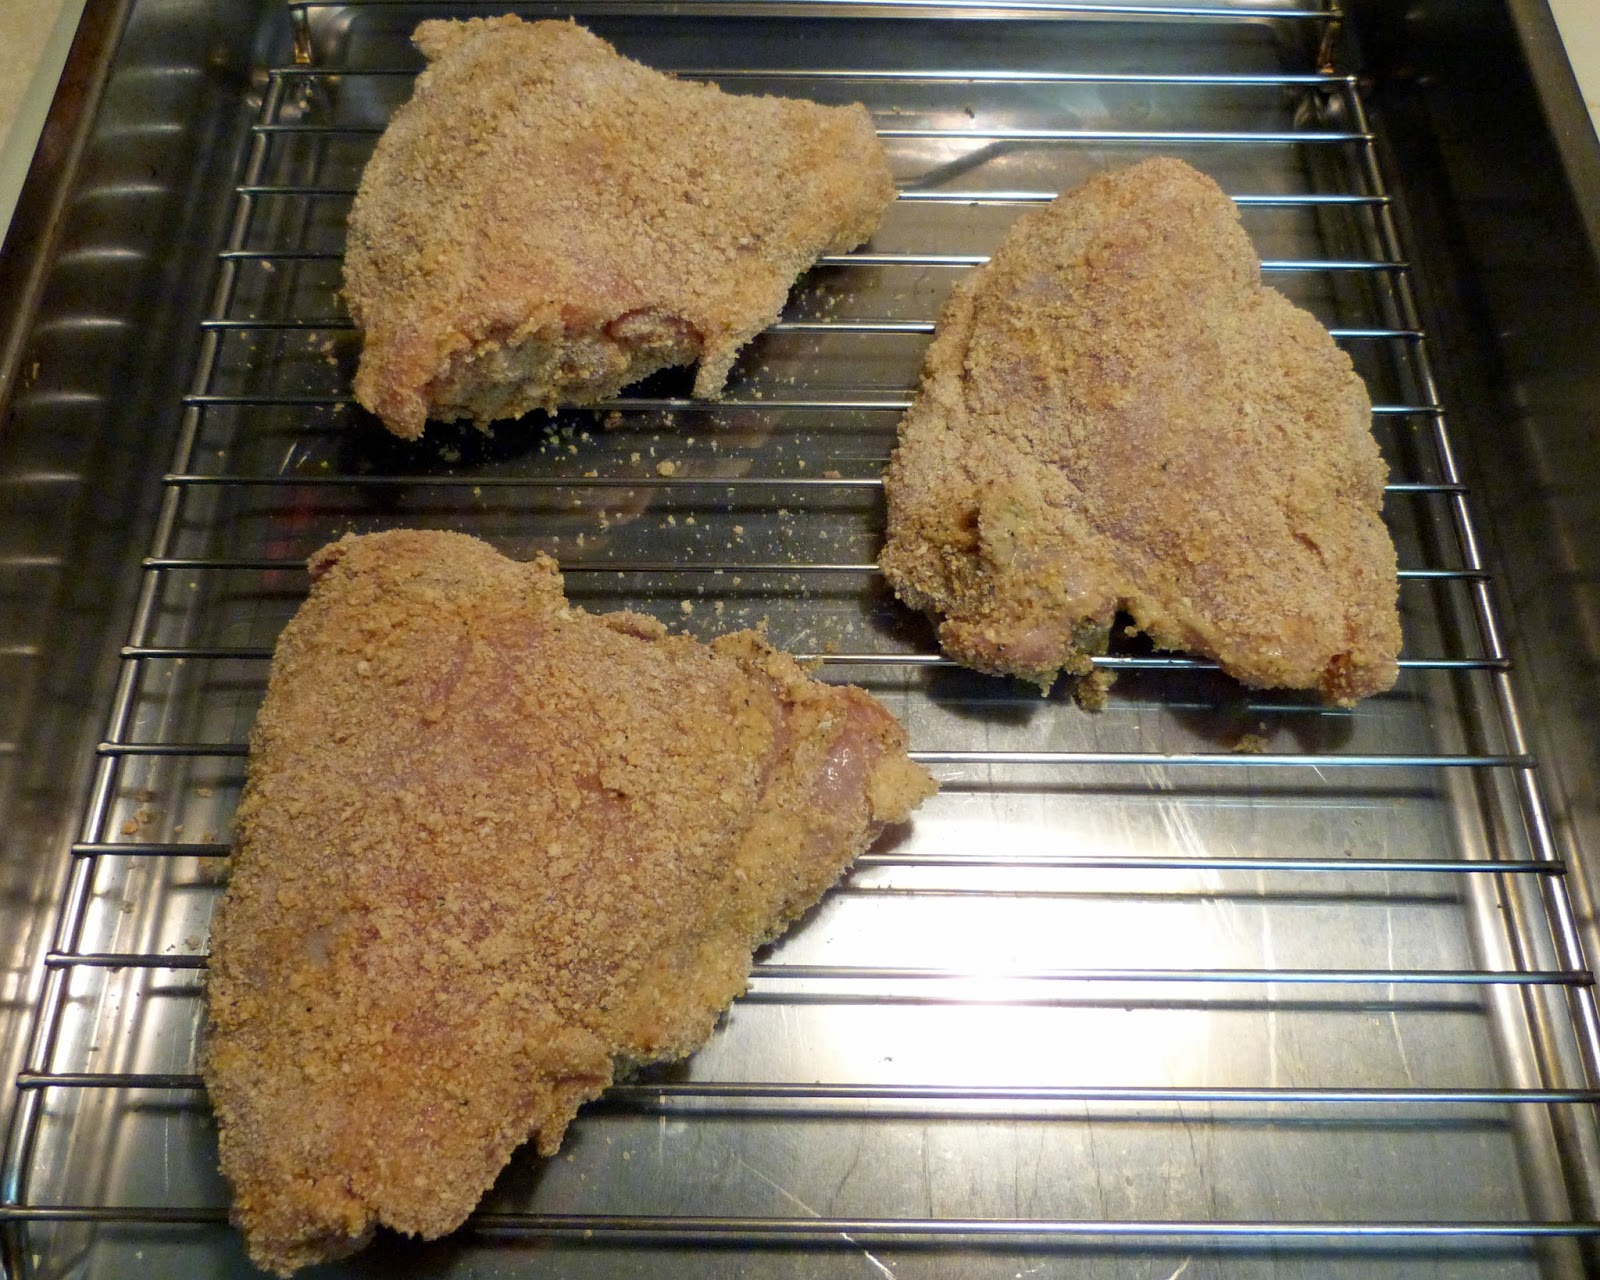
Breaded Baked Chicken

Breaded chicken is one of my old standby recipes, and one I've been making for years now, and it's been a long time coming on this blog. I actually had to check back at the old posts just to make sure it hadn't been covered already! It's very simple, made from ingredients I always have on hand, and is always a hit in our house.


This recipe can be used as a baseline for experimentation. I have substituted fat free Greek yogurt for the mayo, and that also turned out great. You can also add some herbs to the mixture.

Ingredients
  • Bone-in chicken pieces (legs and thighs work well)
For each chicken piece
  • Salt and pepper to taste
  • 1/2 Tbs light mayonnaise
  • 1/2 Tbs Dijon mustard
  • Dash of Sriracha chili sauce
  • Bread crumbs

Instructions

Preheat oven to 425 degrees. [Note: I am not sure our rather aged oven is showing the temperature accurately, so this may be slightly high]

Combine the mayonnaise, mustard, and sriracha sauce in a bowl and mix thoroughly. Spread breadcrumbs on a plate. Remove skin from the chicken, and dust each side with salt and pepper. Liberally rub the mustard and mayo mixture over each piece, then press into breadcrumbs to coat.


Bake the chicken until cooked through and browned on the outside, about 40-45 minutes. I like to cook them on a wire rack over the pan.

Monday, January 12, 2015

Carbonade Flamande

No Free Lunch has recently passed two great milestones: the three-year anniversary of my first post and 10,000 views. I am always amazed by how many views the blog continues to get, even through the long period of hibernation, so whether you are a long-time reader or first-time visitor, I appreciate you stopping by! As one of my earliest posts, just a few days short of 3 years ago, was my recipe for Guinness Stew, it seems appropriate to mark the occasion with another beer-based beef stew.


Carbonade flamande, known as stoverij in Flemish, is a traditional Belgian dish that I have been wanting to feature for a while now, and there is no better time than this cold and snowy January. I scoured the internet for recipes, and came up with this one. Carbonade has three main ingredients: beef, onions, and beer. Other than those three things, the recipes vary quite a bit, but most emphasize the sweet-and-sour aspect of the dish. As such, I have made sure to include both brown sugar and cider vinegar. My version also has carrots. Although they are not a "core" ingredient, they add some color, some variety, and some more sweetness. As with many slow cooked dishes which probably have roots in "peasant food" (cassoulet would be another), I try not to get too hung up on what is or is not traditional. The spirit of this style of food is to use what is available to create something more than the sum of its relatively humble parts.

Ingredients
  • 3 lb beef, cut into 1-2 inch chunks (see notes below)
  • 3 onions
  • 2 carrots
  • 3 Tbs flour
  • 1 1/2 cups (one 12 oz bottle) ale (see below for discussion)
  • 1 1/2 cups beef stock
  • 2 Tbs brown sugar
  • 2 Tbs apple cider vinegar
  • 1 Tbs mustard
  • 2-3 bay leaves
  • Dried thyme
  • Salt and pepper
  • Vegetable oil


The beef I used here was a big package of pre-cut "beef for stew" from Sam's Club. Any inexpensive cut should do. In the sources I found, there was a wide variety of beer recommendations. As with wine, I would stick with the old rule of "only cook with what you would drink." That said, it does feel like kind of a waste to toss a bottle Trappist ale into a stew. At the same time, you do want something with a good, strong flavor to impart to the stew. Sticking to the Belgian theme, I went with a Summit Abbey Ale. This is a strong, Belgian-style ale that I had something of a windfall of a few years ago, and have been "aging" ever since. My point here is that you should go with what you like. On the same note, I probably should have used a more authentic mustard, but Dijon is what I had, so that's what went in, at the risk of veering into boeuf bourguignon territory.

Instructions

Ideally, we will use just one pot for the whole process, so choose something you are comfortable searing meat in, but that will also be big enough to simmer the stew. A dutch oven or a copper stew pan (as pictured here) does nicely. Copper pans are useful for getting just the right amount of sticking from the meat, as well.


Season the beef with salt and pepper. Patience is the key to browning the meat. Work in batches, searing the beef pieces in the pot with a little oil. Resist the temptation to speed things up by cramming more pieces in -- the browning will be more successful if you don't crowd them. I found the sweet spot to brown well, but not burn was halfway between medium-high and high heat. Sear one side, then flip, sear the other, and set aside. Quite a bit of fond will form on the bottom of the pan, and that's a good thing.


While the beef is cooking, you can prepare the vegetables. Slice the onions into strips. Peel the carrots and cut them up. I went for bigger pieces, cutting the carrots into 3-4 segments, and then halving or quartering these pieces, depending on thickness.


When all the beef is done and set aside, turn the heat down to medium and add some more oil. Cook the carrots and onions for about 15 minutes, stirring frequently. These should be well softened. Add the flour, and stir to coat. [In the interest of full disclosure, I forgot this last step, and added the flour after the stock and beer, making sure to mix it into a paste with water. This worked out fine.]

Ready to simmer

Pour in the stock and beer, then scrape up any bits left stuck to the pan. Add brown sugar, vinegar, mustard, bay leaves, and a good dusting of thyme. Stir everything together. Turn up the heat and bring to a boil. Once boiling, turn heat down to low and simmer, covered, for 2 1/2 hours. By this point, the beef should be fall-apart tender. Add salt and pepper to taste.

Serve the stew with the starch of your choice. Potatoes, french fries, noodles, or rice are good options. You can't go wrong with a piece of crusty bread, either.

Friday, January 9, 2015

Lovers' Shrimp (鴛鴦蝦仁)

After an extended absence, I am pleased to present my latest discovery from Pei-Mei's Chinese Cook Book. The unusual name for the dish initially piqued my interest, and needs some explanation. Pei-Mei herself provides none. My interpretation is that the two different colored shrimp are the lovers. That said, the dish also feeds two nicely, with an attractive presentation. In the Chinese name, "鴛鴦" is an idiomatic phrase for an affectionate couple, comprised of the words for a male and a female duck.


My version of the dish, only slightly changed from the original, is very easy to make, and very satisfying. I was initially skeptical about the ketchup, but it somehow just works. As usual, I'll make a few comments here about ingredients. Getting actual Shaoxing rice wine (other than the salted "cooking" wines found in Asian markets) is basically impossible, so I substitute dry Amontillado sherry. This particular bottle was purchased rather cheaply at Trader Joe's. The vegetables are going to vary by season and availability. I used gai-lan in the picture, but pea shoots are also good. In a pinch, broccoli or spinach will work, too. Shrimp is up to preference, although I find the Argentine red shrimp I discussed in an earlier post work very well. The ketchup is, of course, Heinz.

Ingredients

Shrimp and Marinade
  • 1 lb shrimp, deveined and cleaned
  • 1 egg white
  • 1 1/2 Tbs corn starch
  • 1/4 tsp salt
Sauce
  • 1 Tbs Shaoxing wine (substitute dry Amontillado)
  • 1/2 tsp salt
  • 1/2 tsp sesame oil
Everything else
  • 1 lb (approx) green vegetable of your choice (gai-lan or pea shoots work well)
  • Salt to taste
  • 1/2 cup chopped green onion
  • 1 Tbs minced ginger
  • 3 Tbs ketchup
  • Vegetable oil

Instructions

Combine the shrimp with egg white, corn starch, and salt in a bowl. Mix well to coat and place in the refrigerator. Pei-Mei recommends marinating at least 30 minutes. You should also take the opportunity to mix the wine, salt, and sesame oil for the sauce to have on hand for later.


Prepare the vegetables first. As with all wok cooking, we will stay at high or near-high heat. Preparation will depend on the vegetables you have available, but I generally stir fry with some oil and salt, then cover until the stalks are cooked through. With gai-lan this will take a little longer. Pea shoots go very quickly. Set vegetables aside when done.


Add some more oil and briefly stir fry the shrimp. Continue frying while adding the green onion and ginger. Finally, add the sauce and cook together quickly. This whole process is reasonably quick, as the shrimp will not take long to cook.


Remove half the shrimp from the wok, then add the ketchup. Stir fry together for a few seconds, just to coat the shrimp. Serve on a platter with the two shrimps flanking the vegetables in the center. Serve with rice.

I have made a few minor adjustments to the original recipe from Pei-Mei's book. As usual, I stir fry the shrimp instead of deep frying. I simply find this easier, as you don't have to mess around with as much oil. I have also measured the onion and ginger by volume, which I feel removed some ambiguity in the recipe. Finally, I increased the amount of vegetables relative to shrimp.